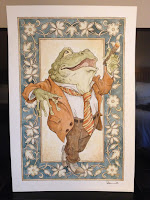
 Every year HEROES CON has an art auction. The proceeds go to help fund next year's HEROES CON, which is one of the last remaining independently owned comic-centric conventions. Shelton Drum & Co. Do a fantastic job of making everyone (exhibitors & attendees alike) feel at home & welcome. Some folks do their piece for the art auction up on a live art-stage at the convention (where attendees can watch the process). I've done that a few times, but prefer to do my piece at home in the studio where I can take more time, assure a level of quality, and not take away any table time for fans at the convention. For today's blogpost, I'll be sharing my process from start to finish:
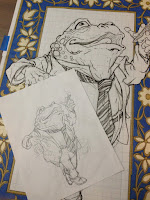
To start I decided to do a Mr. Toad piece this year because of my upcoming Wind in the Willows book coming out later this year. I robbed a rough sketch for one of the interior illustrations and made a few alterations so that it worked as an isolated stand-alone image. I also added in parts of a stock border pattern I found online and printed out an enlargement to match the size of the mat-board stock I was going to be painting on to. The printout (shown w/ sketch below is a taped together quilt of 8.5" x 11" printer paper pieces. You may be able to see a faint grid on the piece, I used that to help me re-assemble the printouts in proper registration.
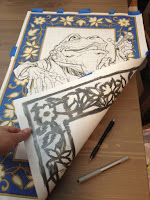
To transfer the image onto the mat-board, I had Julia rub a graphite stick on the back wherever there was art. She did this work on the lightbox so that she could see through the paper and only apply graphite where it was needed and not everywhere. I know some fans & other artists questioned why I didn't just use carbon/graphite paper. I opted this method because it was just easier, I didn't have any of the transfer paper, but I did a have a graphite stick...and I'd done this before and knew it would work.
With the graphite backed printout taped to the mat-board, I re-drew over the lines with a ball point pen. Wherever I applied pressure with the pen, the graphite of the back transferred onto the surface of the mat-board. To ensure proper registration of the transfer, I taped the printout down well on multiple sides so that it couldn't slip or shift as I worked. Below you can see the image fully transferred. There were a few gaps or odd points where the graphite didn't come off or I missed tracing over a line with the pen, so I drew with a pencil right on the mat-board to fix those spots.
First step in the painting process was the lightest of washes. I used a cheap large watercolor tray, the kind of tray they give kids in schools...nothing fancy. Here I focused on getting the lighter details in the border and the background behind Toad a warm pale yellow/beige.
The first washes dried, and I applied more to build up warmer colors, variance of tones & values, and subtle little organic textures. I also added a detailed darker wash to the darker warm-border elements.
The skin tone on toad started with warmer yellow greens, especially around his lower jaw-line and the palms of his hands. Looks like while I had the yellow part of the pan still wet, I also got Toad's necktie & shirt started.
The light orange washes were then started on the jacket and pants while I added darker greens and rendered details to Toad's face.
I'm starting to sound like a broken record describing the additional layers of watercolor washes, but that's pretty much the process over and over...sometime applying it onto wet or damp work or waiting until that area is dry (or bast it with a hairdryer if you can't wait) depending on the desired effect. Here I added more tone to the jacket, pants, and cigar.
The last painting step as to add the darkest tones and sharpest details. The blue-grey border tone was something I raced to get done, because I was then delivering this piece to Comfort Love & Adam Withers, artists from Michigan who were driving down to Charlotte for Heroes Con. They graciously offered to deliver this 20" x 30" piece that would not fit in my luggage....but I wasn't done with it yet...
When I arrived in Charlotte and got my piece from Comfort & Adam, I went into the 'inking' stage back in my hotel room. I put inking in quotes because, instead of using ink to add in clarity through line, I used a dark brown color pencil. Here below, I am getting the details of the border outlined (which was the most tedious part of the outline work)
The more enjoyable part of the color pencil work was on the figure itself, especially around Toad's knuckles.
Here again is the final piece. It raised $2,400 for Heroes con and went home with a lovely couple who came by the day after the auction so we could get a photo together.
To see the process for last year's piece:
2016 Appearances:


No comments:
Post a Comment
Note: Only a member of this blog may post a comment.