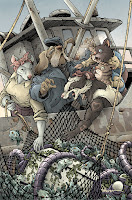
I've been asked to provide a variant cover for Issue #3 of the series and in this blogpost I'll go through the steps to making the final art you see here.
If you'd like to go back and see a variant cover I did for Volume 1, I have a blogpost for that one too: http://davidpetersen.blogspot.com/2014/06/wilds-end-cover-process.html
Layout: I was given an outline of some early issues, some character concept art, and some editor suggestions for cover ideas. One of which I mis-read as 'All the characters shocked to be pulling in one of the aliens in their fishing net'––when in-fact it was more like 'one character, looking away not noticing the alien is trapped in the net'. Whoops.
Well I drew these characters each separately on copy paper, and assembled them in Photoshop. I also had a 3D fishing boat model as reference, and I pasted in a drawing from the concept art of the alien 'lantern body'. I added some flat colors to help me see all the forms and plan for avoiding tangents and bad compositional overlaps, and I sent it off, apologizing to the editor for misreading the brief and hoping it would still be ok.
Well I drew these characters each separately on copy paper, and assembled them in Photoshop. I also had a 3D fishing boat model as reference, and I pasted in a drawing from the concept art of the alien 'lantern body'. I added some flat colors to help me see all the forms and plan for avoiding tangents and bad compositional overlaps, and I sent it off, apologizing to the editor for misreading the brief and hoping it would still be ok.
Inks: Turns out it was ok. The team liked the composition and felt that since this is a variant cover, I had more narrative leeway. I printed out the above layout and taped it to the back of a sheet of Strathmore 300 series 11" x 17" bristol.
On my Huion lightpad I was able to see through the surface of the bristol to use the printout as a guide to ink from. I used Copic Multiliner SP pens (the 0.7 & 0.3 nibs).
Most of the inking was straight forward, but I did consider inking the badger character's dark spots flat black, before opting to leave them open so I could show more fur texture and details around the muscles & eye.
Color Flats: When the inks were approved by the editorial team, I scanned them in and started the coloring process by painting in mostly flat colors. This process, known as 'flatting' is a professional version of coloring in the lines, but also helps set up the digital file to be able to later re-isolate areas to render them separately.
Many of my color choices were already established in my layout, but they still needed subtle shifts in value, hue, and saturation until it all looked right against the inked lines rather than a pencil drawing collage.
I added in color hold (areas where I want the ink work to be a color other than black) on the Badger's tattoos, the ship's lettering, the alien's tentacles, the cat's eyes, and the polkadot bandanna.
I added in color hold (areas where I want the ink work to be a color other than black) on the Badger's tattoos, the ship's lettering, the alien's tentacles, the cat's eyes, and the polkadot bandanna.
Final Colors: The last step was to render the color. I do this with Photoshop's Dodge (lighten) and Burn (Darken) tools and a stock textured brush (Dry Brush).
Around character's noses I also lassoed areas and tinted them a bit pinker/warmer as well as using a textured paint brush to add some rust coloration to the ship's hull.
Wild's End Vol. 4 Issue #3 is available for your comic shop tomorrow August 16th


No comments:
Post a Comment
Note: Only a member of this blog may post a comment.