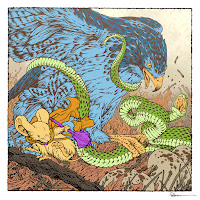
Like last year's calendar, this new one will feature half of the months featuring new-for-this-project artwork, while the other months feature existing favorite illustrations.
Below in this blogpost I'll walk through the process of creating the artwork
Below in this blogpost I'll walk through the process of creating the artwork
This piece started with a photo of a hawk attacking a pile of leaves (presumably for small hiding prey). I liked the idea of one calendar piece being about a predator battle, but thought, what if the hawk were fighting a snake and that allowed a mouse to hide or escape.
I drew the hawk and snake on separate sheets of copy paper with the aid of photo reference. I also drew a mice high-tailing it out of there while eyeing some eggs. These were all assembled in photoshop, with each drawing being tinted a different color (to help me see the different drawings easier) and some quick blocky groundcover painted in as well as a stock mace 3D model rotated correctly to match the mouse's pose.
I drew the hawk and snake on separate sheets of copy paper with the aid of photo reference. I also drew a mice high-tailing it out of there while eyeing some eggs. These were all assembled in photoshop, with each drawing being tinted a different color (to help me see the different drawings easier) and some quick blocky groundcover painted in as well as a stock mace 3D model rotated correctly to match the mouse's pose.
I printed the above digitally assembled layout onto two sheets of legal sized paper (taping them together so the image was 11" x 11") and then taped them with painter's tape onto the back of a sheet of Strathmore 300 series Bristol.
On my Huion Lightpapd I was able to see through the surface of the bristol down to the printout and use it as my 'pencils' as I worked. I used Copic Multiliner SP pens (the 0.3 & 0.7 nibs).
I inked this piece focused mainly on the hawk and snake and keeping them interesting, but not overly cluttered with detail (especially in the snake's scales).
 With the inks finished, I scanned them into Photoshop and started the coloring process. That first step is known as 'Flatting' and essentially is professional coloring-inside-the-lines. I didn't know what the overall color palate was going to be, so I used all awful abstract colors just to make sure I had every shape established: The hawk's lighter feathers, the hawk's darker feathers, the snake, the snake's belly, the leaves, the sticks, the eggs, etc...
Here I also established color holds (areas where I want the ink lines to be a color other than black) on the eggs, and then everything behind the mouse, and then another on everything behind the hawk & snake.
The final step was to render the piece. I used the Dodge and Burn tools in Photoshop while using a stock textured brush.
I had to do a lot of color replacing before I could start the rendering though. I began with colors close to their real life counterparts and then started adjusting hue and saturation until the piece worked as a whole.
The colored image appears in the calendar for 2024
The colored image appears in the calendar for 2024


No comments:
Post a Comment
Note: Only a member of this blog may post a comment.