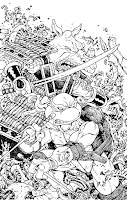
Last week I showed my Pencils/Layout stage for my TMNT/Usagi 5 issue adjoining covers. This week I'm going through the inking process for this massive piece. Above you can see a photo of the inked covers all lined up on a table in my studio before I scanned them.
The trick was that covers 2, 3, & 4 were all narrower since the 'bleed' (the extra area of safety art for when the printed comic is cut to size) was just a bit of the covers adjacent to them––and figuring all that out as well as doing the math and making sure it all went together was a little stressful.
As I finished a cover, I'd tape the next piece of bristol onto the previous cover and continue inking any forms that carried over (Usagi's leg, Leo's sword, clockwork parts, WhereWhen's arm, etc.), then I'd carefully tape the newly started cover to the prinout, and carefully untape the previous cover from everything and carry on.
To ink this piece I use Copic Multiliner SP pens. These are technical nylon nibbed pens similar to Microns, but I prefer Copic's version. The SP's are an aluminum bodied pen with the option to swap out worn nibs and empty ink cartridges (though I almost never need to replace nibs––one of the reasons I prefer these over Microns)
Most of this is done with the 0.7 nib, and I just feather my pressure or go back over areas as I ink to get the desired line weight and sensitivity. The 0.3 nib is usually only brought in for fine facial details like eyes, noses and mouths where a slight error in thickness or contour can spoil the entire piece.
Some of the textures I already had a mental catalog of from my past TMNT covers such as their back shells, belts, and elbow/knee pads. But I then had to play with other densities of line and pattern to help differentiate the parts of the Usagi crew's Samurai armor.
For the clockwork robot debris, I really had to play with scale of form as well as density of line & shadow to help make sure that while it looked like the chaos of battle, it didn't look like static on a TV with no discernible forms or places for the eye to rest––a lesson I learned when doing a similar junk pile for the Plotmasters Revisit episode of R-Wars
This was a step I dreaded, because I knew that even with my taking time to do the math for the layout, and carefully aligning each sheet of bristol with the layout crop and/or bleed lines, there was always a chance I wouldn't be able to get all the pieces back together again without some hassle and/or gaps.
There were a few minor gaps and adjustments to make. I made a new layer in photoshop to digitally ink over any gaps in the seams, so that the line of one form smoothly flowed over to the next cover. All-in-all, this process that I dreaded as a potential nightmare took less than 15 minutes.
Below are detail images of the inks for each character:
I'll be selling all my inked covers together in my online store the same day the first issue goes on-sale in stores: mouseguard.bigcartel.com


No comments:
Post a Comment
Note: Only a member of this blog may post a comment.