Tuesday, November 29, 2022

October Mouse Guard 2023 Calendar Art

This year I'm releasing a Mouse Guard 2023 Calendar. I'll be taking copies with me to Baltimore and selling them through my Online Store. I created seven new pieces of artwork specifically for the calendar (even numbered months mainly). The new pieces were all drawn at 12" x 12" (the size of the Calendar itself)

To the left you can see the final art piece for October. I didn't want to do a spooky October piece, but I did think it should have a pumpkin in it, so I came up with a lantern-lit pumpkin-cider booth...inside a pumpkin

Below in this blogpost I'll walk through the steps to creating it.


Reference:
This istock photo is one of many many many pumpkin photos I looked at for reference before starting the piece. This photo helped me more with the look of the ground cover and the pumpkin leaf greenery behind the pumpkin booth. So while I did look at this image, I didn't directly reference it (or any of the other dozens of wild growing pumpkins I found photos of), but looked at it for inspiration.


Layout:
The first step was the pumpkin booth. I wanted there to be a bit of an up-angle for our view so that we could see the wall thickness of the pumpkin rather than it being obscured by the canopy. Once I had the pumpkin, bar, barrels, and leaves drawn I scanned them into Photoshop and figured out where in the frame it would fit. The placement I chose meant I had to draw more greenery on top as well as all the mouse characters on a separate sheet of copy paper (using a small prinout of what I already had on a lightpad). I added in the rope lines for the lanterns digitally and drew the lanterns themselves on the same sheet as the mice.

Inks:
With the above layout all set, I printed out the image (onto two sheets of legal paper that had to be registered and taped back together). I inked this piece on my Twitch stream on a Huion lightpad. Using the lightpad I could see through the 12" x 12" Strathmore bristol to the printout below so I could use it as a pencil guide. I used Copic Multiliner SP pens.

There was a lot of density of texture on the floor and in the background, so I tried to be simple with any tones I added to the barrels, mouse clothes, or pumpkin.

Flats:
When the inks were done I scanned them into Photoshop and started the coloring process. In this step I am filling in each area with a flat color (no rendering, no textures)–it's like a professional version of coloring-in-the-lines. Many of the colors were obvious from nature for the scene, but it still took some time to dial in specific hues and tones for them. How light or dark, how saturated, how warm, how cool, etc. I fiddled with for a bit before starting the actual coloring

At this stage I also establish the color holds (areas where I want the lineart to be a color other than black) on the lanterns and cider.


Final:

I rendered the piece using dodge and burn tools as well as a stock texture brush to add all the light, shadow, and texture. There was a play of light in this piece (the light coming from inside the pumpkin as well as from the lanterns) that was a hard thing to render without also over-rendering and overworking the piece. I hope that I found the balance so that it just feels like a fun crisp air evening where there's plenty of warmth from the setting and company.

The Calendar is available in my online store: https://mouseguard.bigcartel.com/product/mouse-guard-2023-calendar


Tuesday, November 22, 2022

August Mouse Guard 2023 Calendar Art

This year I'm releasing a Mouse Guard 2023 Calendar. I'll be taking copies with me to Baltimore and selling them through my Online Store. I created seven new pieces of artwork specifically for the calendar (even numbered months mainly). The new pieces were all drawn at 12" x 12" (the size of the Calendar itself)

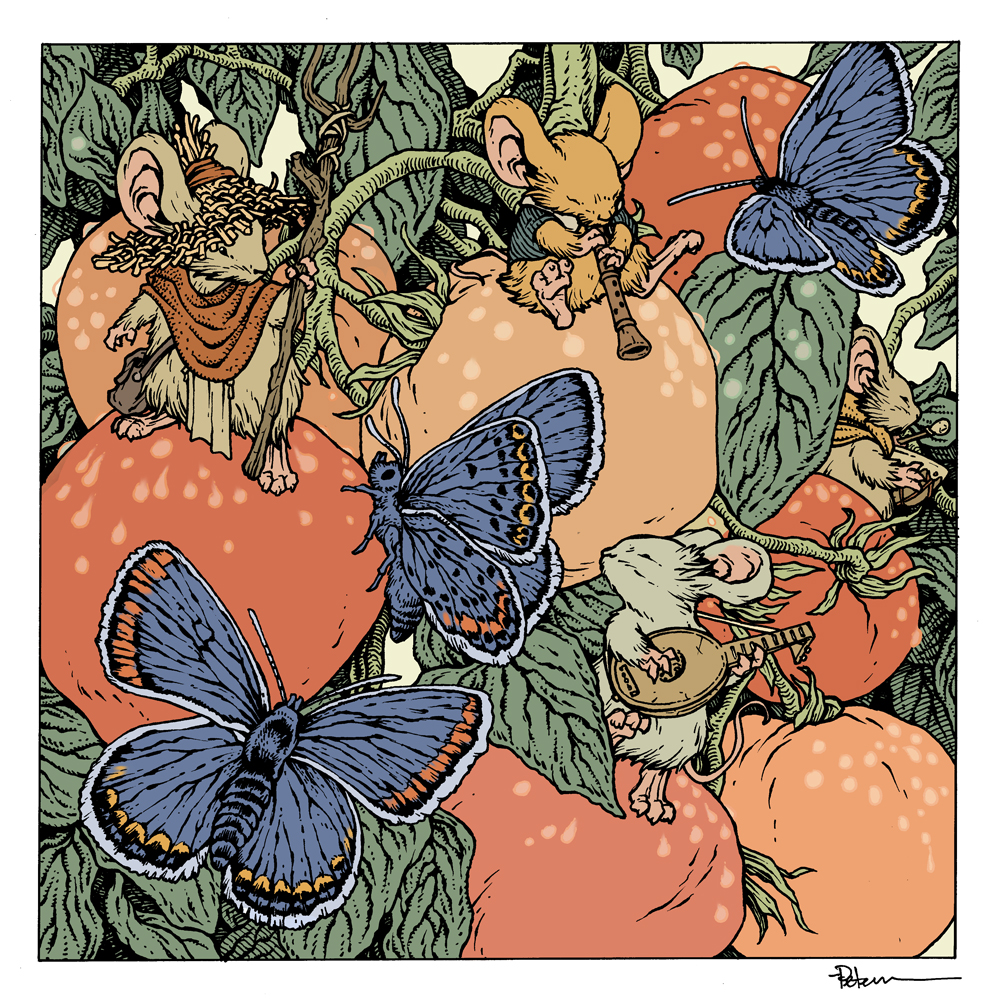
To the left you can see the final art piece for August. Inspired by tomatoes growing in my back yard, I wanted something more pastoral and calm featuring plants and food.

Below in this blogpost I'll walk through the steps to creating it.

Reference:
In our back yard Julia grows a few different types of tomatoes. These were growing in a raised bed and while Julia was away dog-siting for her sister for a week I was watering them this summer. Unfortunately, we only were able to enjoy a few of them before critters started taking nibbles out of each one that was even close to ripe.


Well, I was starting work on the calendar project when Julia was away, and I liked the shapes and colors, thinking every time I watered it that it would be a good backdrop for a piece. Here's a pic I grabbed on one of those watering sessions.

Layout:
I started with re-drawing the photo using the reference. I needed to crop the image down and figure out how I was going to handle rendering the texture of the leaves. I then drew a farmer mouse with a wooden pitchfork(?) standing watch over his harvest. But the piece needed more, so I added a little band of musicians who I guess are celebrating the bounty. And then I still felt like it needed more, so I added three fur Karner Blue butterflies to help the scene. I do feel like this is an illustration that got away from me in terms of composition or focus, but then somehow worked itself out through no fault of my own.

Inks:
With the above layout all set, I printed out the image (onto two sheets of legal paper that had to be registered and taped back together). I inked this piece on my Twitch stream on a Huion lightpad. Using the lightpad I could see through the 12" x 12" Strathmore bristol to the printout below so I could use it as a pencil guide. I used Copic Multiliner SP pens.

I inked a lot of the mice with the 0.3 nib Multiliner rather than the 0.7 I do most everything else with. This piece is all about density of detail and texture distributed within some orbs of open space.

Flats:
When the inks were done I scanned them into Photoshop and started the coloring process. In this step I am filling in each area with a flat color (no rendering, no textures)–it's like a professional version of coloring-in-the-lines. TSome of the colors I was able to eye-dropper from the original reference photo. The butterflies were interpreted from photo references, and the mice were colored to not clash or blend in with the scene.

At this stage I also establish the color holds (areas where I want the lineart to be a color other than black) on the water droplets.


Final:
I rendered the piece using dodge and burn tools as well as a stock texture brush to add all the light, shadow, and texture. Getting the the tomatoes rendered was first priority since the amound of realism & volume in them would discate how far I had to push everything else. I had some fun using a freehand lasso tool (with a slight feather) and changed the color balance several times around the butterfly wings to give more color depth and a slight iridescence. 

The Calendar is available in my online store: https://mouseguard.bigcartel.com/product/mouse-guard-2023-calendar


Tuesday, November 15, 2022

June Mouse Guard 2023 Calendar Art

This year I'm releasing a Mouse Guard 2023 Calendar. I'll be taking copies with me to Baltimore and selling them through my Online Store. I created seven new pieces of artwork specifically for the calendar (even numbered months mainly). The new pieces were all drawn at 12" x 12" (the size of the Calendar itself)
To the left you can see the final art piece for June. I wanted a moment of exhaustion and peace after the battle. I was also able to bring in a stained glass window I'd drawn before (used for the back cover of the sketchbook Dawn, Daye, Dusk)

Below in this blogpost I'll walk through the steps to creating it.


Layout:
I started with the room (dropping in the stained glass window art I mentioned earlier). Unfortuneately somewhere in this, I lost the perspective of the floor, and it somewhat ruins the illustration, but I tried making it less distracting in the coloring stage. Next came the exausted mouse (wearing a cloak clasp with an anvil on it––this is meant to be somewhere in Ironwood) The snake was drawn separately referenced from a few photos of Michigan's Eastern Massasauga rattlesnake. Everything was reassembled in Photoshop where I tinted the pencil drawings different colors and added in some digitally drawn details (unfortunately I didn't see the perspective issues.)
Inks:
With the above layout all set, I printed out the image (onto two sheets of legal paper that had to be registered and taped back together). I inked this piece on my Twitch stream on a Huion lightpad. Using the lightpad I could see through the 12" x 12" Strathmore bristol to the printout below so I could use it as a pencil guide. I used Copic Multiliner SP pens.

Most of this was fairly straight forward except for the snake's scales and dark spots.. I then had to balance the level of line density in the background wooden planks and beams so they receded into the background and didn't distract from the snake.

Flats:
When the inks were done I scanned them into Photoshop and started the coloring process. In this step I am filling in each area with a flat color (no rendering, no textures)–it's like a professional version of coloring-in-the-lines. The colors for the window were already established from the original piece of artwork––the mouse, snake and background were variations on tones already in the window

At this stage I also establish the color holds (areas where I want the lineart to be a color other than black), here the glass, the mouse's cut, and the snake's eye


Final:
I rendered the piece using dodge and burn tools as well as a stock texture brush to add all the light, shadow, and texture. The light coming through the stained glass window (as well as the cast light spots on the characters did a lot of heavy lifting before I even started to render the scene and figures. As I mentioned earlier, I needed to draw your eye away from the perspective issues, so the tile floor is much darker and more muted than I'd originally envisioned.

The Calendar is available in my online store: https://mouseguard.bigcartel.com/product/mouse-guard-2023-calendar

Tuesday, November 8, 2022

Amazing Screw On Head Fan-Comic (2004)

Back in 2004 I was an active member of the Hellboy forums on CBR. We had a great community who were fans of Mike Mignola's work, but also a support community for our various hobbies, crafts, and artwork. A group of us decided it would be fun to put together a web-only fan comic, a few pairs each working on a short story of a Mignola creation. Animation director Tad Stones did a Hellboy Jr. short, Lyndon Webb drew a Lobster Johnson tale (perhaps with another member as a writer), and Maija Graham and I collaborated on a Screw On Head comic.

I'd been playing with a watercolor technique where after I painted the shapes loosely, I'd outline all the blotches of color and tonal shifts with pen. And while it worked great for one-of pinup images, (especially with Mike's characters since they are so shaped based) I was curious to see how far I could push it and if it would work for sequential pages.

Each panel was drawn and painted separately and then assembled in Photoshop with borders and text. As a community event, I also offered to mail a panel to any forum member who sent me a mailing address until they were gone. I also mailed the panel with Screw On Head and the number 17 to Mike himself.

The Hellboy forum that we were a part of back in the early 00's is long gone, but I still have several friendships that have lasted ever since. And I thought it was time to dust off these pages and share them with you all.


Tuesday, November 1, 2022

April Mouse Guard 2023 Calendar Art

This year I'm releasing a Mouse Guard 2023 Calendar. I'll be taking copies with me to Baltimore and selling them through my Online Store. I created seven new pieces of artwork specifically for the calendar (even numbered months mainly). The new pieces were all drawn at 12" x 12" (the size of the Calendar itself)

To the left you can see the final art piece for April. I wanted to do a sailing scene.

Below in this blogpost I'll walk through the steps to creating it.


Reference:
I've drawn boats in Mouse Guard before, boats as primitive as a few leaves waxed together, or a simple canoe, or a multi-passenger vessel like Conrad's Red Snapper. For this piece I looked at references of junk ships and viking longboats before settling on this norse sailing vessel.

I found a few photos of this ship at different angles and started imagining it coming from the port of Rustleaf rather than Port Sumac.


Layout:

I drew the boat on a sheet of copy paper with some water suggested on the bow and side. Once I had the boat resized, rotated, and cropped in a Photoshop file, I used a lightpad to draw its passengers on another sheet of paper. I drew the a mouse sailor with a bee companion, a short sword ready Guardmouse, and a healer on the lookout. I added in maple leaf shaped icons to help push the idea that this boat is from Rustleaf (perhaps in an official capacity?). The image was composited together with some color blocking to help fill in the water detail and ropes added using a straight line tool.


Inks:
With the above layout all set, I printed out the image (onto two sheets of legal paper that had to be registered and taped back together). I inked this piece on my Twitch stream on a Huion lightpad. Using the lightpad I could see through the 12" x 12" Strathmore bristol to the printout below so I could use it as a pencil guide. I used Copic Multiliner SP pens.

The trick in this piece is how to balance the positive and negative shapes of the water––something I've done since the second issue of Mouse Guard, but always feel like I need to re-learn how to do it when I have to ink bodies of water again.

Flats:
When the inks were done I scanned them into Photoshop and started the coloring process. In this step I am filling in each area with a flat color (no rendering, no textures)–it's like a professional version of coloring-in-the-lines.

At this stage I also establish the color holds (areas where I want the lineart to be a color other than black), here the water, the maple leaf icons, the sail's stripes, and the healer's embroidery.


Final:
I rendered the piece using dodge and burn tools as well as a stock texture brush to add all the light, shadow, and texture. Figuring out the tones for the water (what should be dark and where there should be highlights) is the first trick in coloring this piece––taking into acound that I can also paint the lineart for the water's color hold. The rest of it was more straight forward, but I felt that some light streaming in helped sell the depth of the piece as well as the Guardmouse shielding his eyes from the sun.

The Calendar is available in my online store: https://mouseguard.bigcartel.com/product/mouse-guard-2023-calendar

Tuesday, October 25, 2022

Soothsayer Deck of Bone Cards

In the Mouse Guard short story 'King, Knight, Fool, Villain' (which you can watch a reading of here: https://youtu.be/A1lm_necUII) A hermit soothsayer offers to read the fortune of a young mouse using a deck of Bone Cards. I've made the deck a reality that now you can own. Tomorrow in my online store the Soothsayer's Deck of Bone Cards is available for purchase, as is all of the original card art for the deck. http://mouseguard.bigcartel.com/product/soothsayer-s-deck-of-bone-cards

It comes with a reference card that explains the method of fortune telling as well as some suggestions for possible interpretations for each card. The deck comes in a burlap pouch with a stenciled mouse skull and crossbones. Below I'll talk more about the deck.

As you can see in these selected panels from the short story, I had do design a few of the cards just to draw the comic. Obviously the King, Knight, Fool, and Villain cards were necessary, but I also had to design the card backs and a handful of other cards that can be seen in a few panels. I'd drawn about ten of the cards just for the story. In the narration there's a line about a few of the card names, as well as fleshing out that there were 37 in total (a number I chose for no meaningful reason). So, while writing this tale, I made a list of what all 37 cards should be. 


To the left you can see the full set of card designs. After the story was done I drew the rest of cards on my Twitch Stream. The originals are black brush pen on Strathmore bristol, but after I scanned them, I did some Photoshop trickery to make them a rusty sepia tone to match the story art as well as add some effects to make them look like they were block printed. (for more info on that technique, I just modified Texture Labs' YouTube tutorial for Grungy Block Printing Type: https://youtu.be/nRcpoRHTU0U. I was able to upload a few versions of the card back as well, with different printing/wear patterns on each to help add to the block printing authenticity of the deck.


In my online store tomorrow I'll be selling the decks, as well as all of the original card art for the set.
http://mouseguard.bigcartel.com/product/soothsayer-s-deck-of-bone-cards 

In the drop down option menu, you can order a deck (or multiples) and/or a deck + one of the original pieces of art (you are not limited to only purchasing one original, just every original comes with a deck of the cards). 


'King, Knight, Fool, Villain' is a short that hasn't been published traditionally yet. It will eventually be collected with 'Piper the Listener', 'The Owlhen Caregiver, and 'The Wild Wolf' as well as two new shorts when I write/draw them. But, I did ask voice actor David Sharp to do a reading of the story that is currently up on YouTube. You can watch below.

Tuesday, October 18, 2022

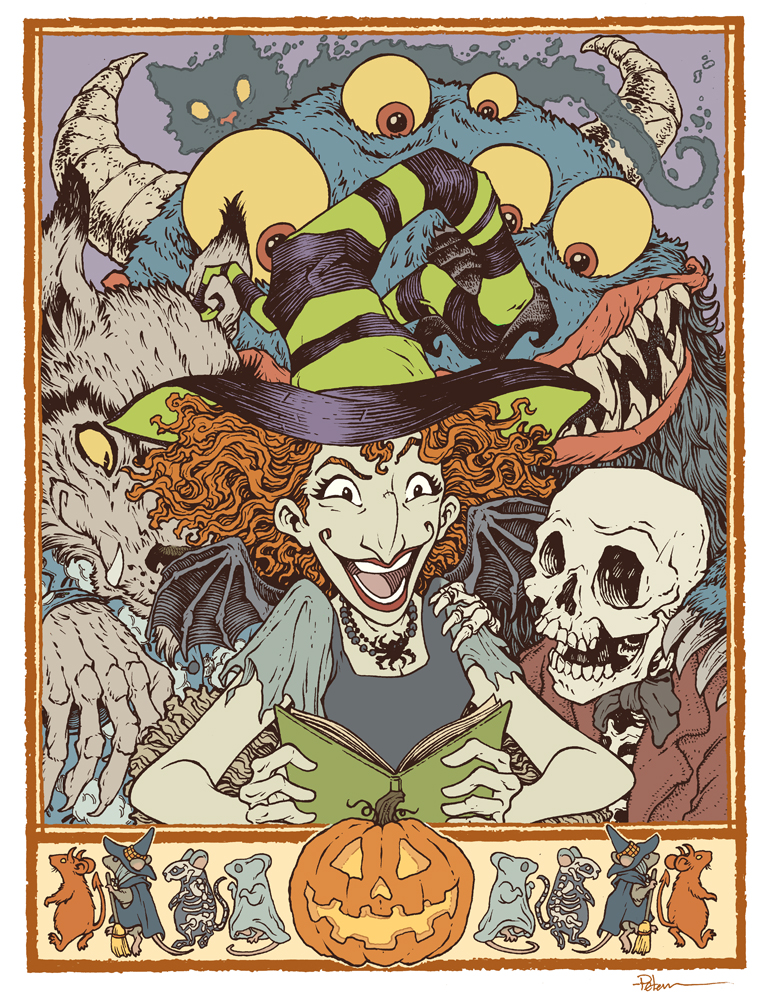
Scary Godmother Tribute for the Baltimore Yearbook

 For roughly a decade the Baltimore Comic Con has published a convention art book called 'The Baltimore Yearbook' that usually features a creator-owned character or property, where that creator is a guest of the convention. Selected guest artists are asked to contribute a piece of fan art for the book to celebrate the creator and property. It allows us to play in someone's world, and offers a chance for attendees to meet new creators as they go around the show floor collecting autographs in their yearbook.

This year's subject is Jill Thompson's Scary Godmother! To the left you can see my finished art, and below in the blogpost I'll walk through my process.
We are always encouraged to include our own characters into our Yearbook piece--to create a cross-over image that might not have otherwise happened. I'm always hesitant to add mice from Mouse Guard into these pieces––but a few years ago in the Blacksad piece I did add a mouse character as they would appear in that title. And here I thought it would be fun to add in some mice dressed for Halloween characters to form a border (and distract from the fact that the rest of the composition would be a character pile-up.

Once I had my border, I drew each character separately (starting with Scary Godmother herself) on copy paper while using a light pad (think of it as making Photoshop layers in the physical world.) I adjusted the size & position of the characters until I had a composition I was happy with (and adding some quick flat color helped me see if the composition worked in terms of light/dark masses.

With the pencils/layout done, I printed out the composition (on two sheets of legal paper that had to be registered and then taped back together) and then taped that to the back of a sheet of Strathmore 300 Bristol. On my Huion lightpad, I can see through the surface of the bristol down to the printout to use it as a guide to ink by. I used Copic Multiliner pens (mostly the 0.7 nib) to do all the inkwork.

The trick was balancing my normal texture work with the usually very open forms Jill has when she draws and paints these characters. The original inks for this piece will be up for auction at the convention.


Once the inks were finished, it was time to start coloring the piece. I scanned the inks and began laying in flat colors. This part of the process is called 'flatting' where the color areas are all established with flat colors (no shading, no rendering, no textures, no effects). Some of the color choices were done for me by needing to be on-model from Jill's comics, but I'd also made some choices for the saturation and values when I did my quick color blocking in the pencils stage.

In this step I also established all the color holds (areas where I want the ink lines to be a color other than black) like Boozle the ghost cat's outline, the border, and the glow inside the pumpkin.


The last step was to do the final rendering and lighting effects for the piece. I did this mostly using the dodge and burn tools and a stock Photoshop brush.

This piece will be published in the Baltimore Yearbook later this month. That book will be available for purchase at the convention and through the con's website afterwards. The original inked piece will also be for sale in the art auction at the con on Saturday.


Blog Archive