Tuesday, June 25, 2024

Recent Commissions

Here are some Toned Commissions from mostly from Lake Como Comic Art Fest and Heroes Con


A Scouting Mouse

A Fan's RPG Mouse Archer Character


Guardmouse with sword & torch


Raphael, a TMNT


Usagi Yojimbo


Guardmouse with a spear


Traveling Adventurer Guardmouse


Kenzie


Saxon


Lone Wolf & Cub


Beep the Meep


Sci-Fi Mouse


TMNT in Samurai Armor on a Sketch Cover


Lieam with a crab looming


Weasel wearing House of Slaughter Mask
from Something is Killing the Children


urVa the Archer on a sketch cover


A fan's Harengon D&D character


Tuesday, June 18, 2024

Guardmouse in Hawk Nest

Before leaving for Lake Como Comic Art Festival I finished a few inked pieces that would be Mouse Guard inked original Artwork available for sale.

My idea was that these would also serve as pages for the next Mouse Guard sketchbook tentatively titled: 'Past Whereabouts'.

To the left you can see the finished colored piece for the sketchbook, but below I'll walk through the process of creating the artwork.
This piece started with the mouse drawing, a Guardmouse holding on to the edge of something, a high rock face, a tree trunk, or––as I ultimately drew in, a hawk's nest.

As I drew the mouse, I liked the plan that this was a younger patrolling Gwendolyn before her time as a Matrirch (though I forgot to add her normal skirting which would help identify her, but also makes sense not to wear when climbing harrowing heights.)

The pencil sketch was scanned into Photoshop so I could block in some color to help me see what areas where what textures. I also added in a photo of a halberd blade for reference.

The above layout was printed out and taped to the back of a Strathmore 300 series sheet of smooth bristol. On my Huion Lightpad I can see through the surface of the bristol and use the printout as a guide to ink from.

I used Copic Multiliner SP pens to do the linework, most of which was focused on giving the nest and branches texture and depth while leaving Gwendolyn relatively clean so she could be seen.

The original inks for this piece are available for sale in my online store:
https://mouseguard.bigcartel.com/product/guardmouse-in-hawk-s-nest
After the inks were finished, I scanned them into Photoshop and started the coloring process. This first step is called 'flatting' because it's just about adding flat colors to all the various areas (her fur color, her cloak color, the sky, the branches, the nest, etc.) It's a professional version of coloring-in-the-lines. 

At this stage I also added a color hold (areas where I want the inkwork to be a color other than black) to the spots on the eggs. I also end up adding another one to act as a light corona in the final coloring stage)
The final color rendering was done using Photoshop's Dodge and Burn tools (to lighten and darken whatever color is present) and a stock textured brush. I did use the paint brush a bit to make my own blush gradient in the background, and I selected areas with the lasso tool and shifted color balance to give nest twigs different tones and Gwendolyn's nose  bit of pink.

As I said at the start, this will eventually be published in my next sketchbook which may be out at the end of this year or the start of next (depending on timing with getting enough pages done between projects AND convention schedules)

Tuesday, June 11, 2024

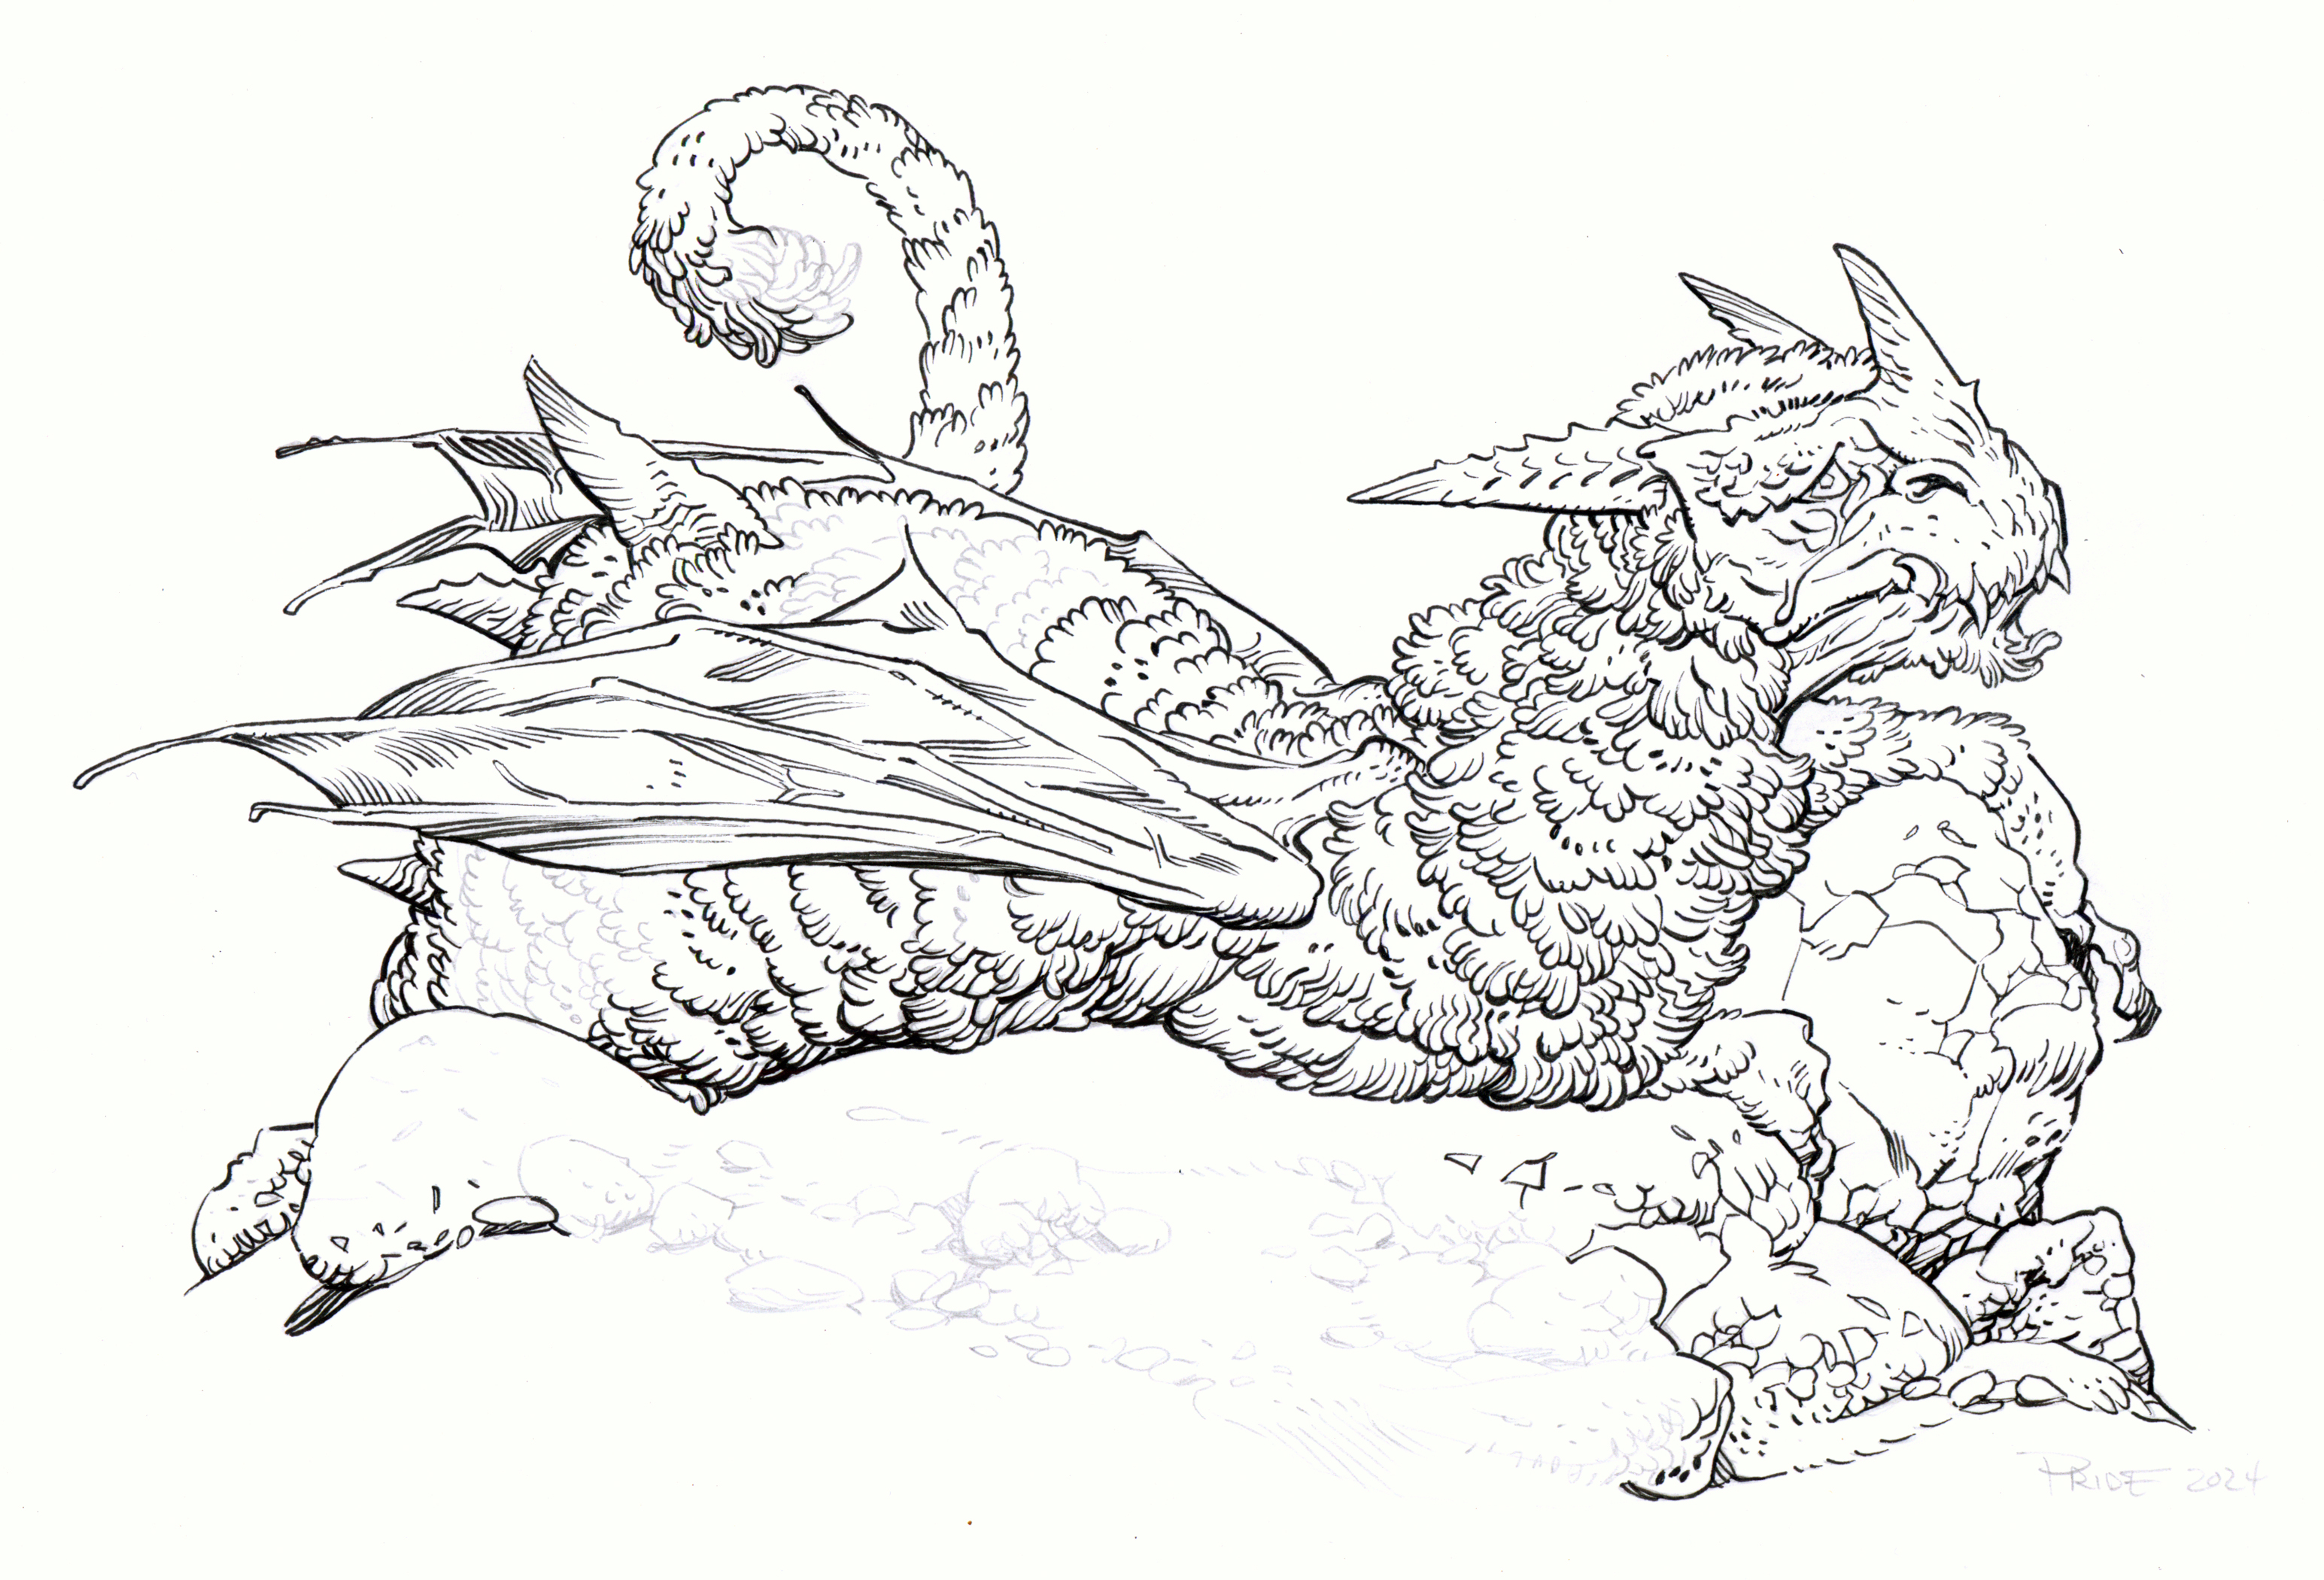
Morose Wooly Dragon

Last week on my Twitch Stream, we did the #DiscoveringDragons Community-Draw-Along! It's a fun event where I welcome all skill levels to push their pencils (or whatever tools they use to make art). It takes place on the first Friday of the month.

I worked on my piece live on my Twitch stream while viewers worked at home and then on the following Monday we shared our finished pieces.

Here is my finished colored Dragon. And below are my steps to create it as well as the community submissions.

For #DiscoveringDragons, I post two or three prompt words for everyone to make into a dragon. It's a nice framework for artists of any skill level to focus some time on an 'assignment' to shake the rust off or get the pencil moving again––all while also being loose enough that there's plenty of room for individual expression and interpretation.

This month the prompt was two words: Wooly & Morose

I opened several tabs of google image searches of sad dragons, Pokemon's Snorlax, Rams & Sheep, and some Mercer Mayer illustrations


I started on copy paper with the head and then worried about fitting it on the paper, so I drew a small thumbnail of the body below it, scanned it into Photoshop and started combining and digitally drawing over the top until I had the bigger shapes figured out I also used a 3D model of Ram hors rotated to the right angle for reference).

I printed that rough out and on a lightpad drew tighter pencils on a lightpad and a new sheet of copy paper.

Those pencils were then re-scanned and I cleaned up my color blocking to help me see what areas were what colors (what was horn vs wool, etc).


I printed out the above design at full scale and taped that onto the back of a sheet of Strathmore 300 series bristol. Using a lightpad, I was able to see through the surface of the bristol as I inked the dragon. I used Copic Multiliner 0.7 pen to ink the art.

The inking on this piece started with the nose and mouth, but moved quickly to figuring out the texture and line density of the wooly hair so it felt matted and curly, but not heavy. I was unable to finish the inks on-stream, but returned to them later that night off-stream, where the inking continued on the rest of the body and the ankle and tail wool.


The next day, I scanned the inks to I could start the coloring process. After prepping the digital scan of the inks, I established a color hold (an area where I want the ink to be a color other than black)––the overall lines became a dark brown. Most of my #DiscoveringDragon pieces have at least two color holds, I think the is the first where I only needed one.

Then it was time to start the color flatting process––basically professional coloring-in-the-lines. Some of this is just to make it easy to re-isolate various parts when doing later painting & rendering. Most of the colors were established in the rough, but I played with the final value/hue choices.

For the final colors I used the dodge and burn tools to add shadows and highlights to give the dragon some form. Most of the work was in darkening in all the shadows in the wooly bits. and then––I opted to do a 2nd color hold on just the wooly bits. Below you can again see the final Dragon...


But, as this is a community event, I wanted to share all the other entries posted in the Discord. 

druffzilla


jodudeit

Knickolaus


Nate Pride


redSkwrl


88UncleErnie


VernNYC


Kasey Snow


Towry


Tuesday, June 4, 2024

HEROES CON 2024 paintings

For my return to Heroes Con next weekend, I've painted two 16" x 20" pieces in watercolor and color pencil. One of them will be put into the Saturday art auction at the convention. The other will be available at my table the next day with a price set from the winning bid of Saturday's auction.

I have not decided which will be in the auction––I think I'll decide when I arrive in Charlotte.

I wanted the paintings to work together as a pair (so if the winning bidder wants the other painting they can come buy it from me) but where each piece would work as a stand alone piece if they went to different buyers. I opted this year to do facing mirrored portraits of Celanawe and Midnight each with the Black Axe.

I did quick color blocking to help me see the forms but also to plan my colors and value ranges when doing the paintings

The pencil drawings were printed out (over 4 sheets of paper that needed to be patchwork taped together––with the help of a grid to get the alignment right) with graphite paper then placed between the printout and the illustration board.

By tracing over the printout drawing with a ballpoint pen, the pressure transfers the image onto the illustration board. This was done for both pieces 


I set up my two paintings and my watercolor trays (old Windsor Newton Cotman tubes that have mostly dried up and I use like dry cakes) on a TV tray and my desk with a large glass of water. It's nice to have two paintings going at once, so that you can swap between them when one is too wet to work and needs some drying time.

I painted the Mouse Guard portraits on my Twitch stream at the end of May.

Instead of now showing a great deal of photos tracking the progress/process of the paintings, I've put them all together in a YouTube video that you can watch below


Watch directly on YouTube:
https://youtu.be/53sW9UVxKNc


Tuesday, May 28, 2024

Vinelings Concept Art Revamp

Reap what you sow when you tangle with the Vinelings, a clan of humanoid-vegetation creatures that can control plant life to ensnare their foes, tangle the mobility of unwelcome travelers, and open the soils to rust and compost any war machines attempting to harvest them.

The plant species can vary from Vineling to Vineling, but they always have multiple vine or root-like arms and never show their faces. Wherever they wander, they cast off pollen and drop the seeds that cause them to stand for generations.

Or––that was the idea. In fact, they are a re-design of an old drawing I 'unearthed' when scanning pencil drawings for my Patreon.


A few months ago I shared a revamp of the Skullduggers from the same unmade gaming project.

Back in the earliest of the 2000's, I was toying with the idea of creating a table-top game (like Warhammer) with simpler rules for movement, army creation, etc. While struggling to design those elegant game mechanics (which never materialized) I only ever drew a few of the types of creatures to populate the game with.

To the right is that old drawing of a single Vineling (I envisioned these were the soldiers that could respawn.)

As a just-for-fun exercise, I thought it would be fun to redraw and redesign an older concept piece of mine like this (Plotmasters style).

I started the new version digitally keeping the basic forms and ideas, but making them as well as the pose more interesting. I did end up penciling the vine arms, legs and seed-pod staff traditionally on a lightpad overtop of a printout of the digital sketch. 

I wanted the arms to be more vine-like and to loose the grill/scarf (I think the original was inspired by the Black Wizard in Final Fantasy Tactics––a game I never played, but always liked the look of that character.)

I printed out the above layout with the pencil's also scanned in and added. That prinout was taped to the back of a sheet of Strathmore 300 series Bristol. Using my Huion lightpad I was able to see through the surface of the bristol to the printout below and use it as a guide to ink from. I used Copic Multiliner SP pens.

This piece was a texture mess––and no good way to make it all make sense in black and white without adding shadows I didn't want in the final color...so I just did my best to control the density.

The original inked artwork is avilable for sale in my online store: https://mouseguard.bigcartel.com/product/vineling-original-art

When the inks were done I scanned them and started the coloring process. That first step is called 'flatting' where the different color areas are all painted in with flat colors..it's a professional version of coloring-inside-the-lines.

The color choices seemed obvious to me looking at the original and so I used similar colors when doing the digital sketch.

I also added a color hold (where I want the black lineart to be a color other than black) to the overall linework and a special glow around the eyes.

Here again are the final colors. They were rendered using the dodge and burn tools in Photoshop and a stock textured brush. 

I have no immediate plans for what to do with these guys, but between my Draw The Extinct creatures, Discovering Dragons, and a few more like this––I seem to have a nice bestiary for fantasy gaming...

Tuesday, May 21, 2024

Nadra Illustration

Last year I did an illustration for my friend Thorin who is developing a RPG setting and novel series called 'Nadra'. Thorin is the son of Alice Finch who was responsible for spearheading the Mouse Guard LEGO display and project that celebrated the Mouse Guard 10th anniversary.

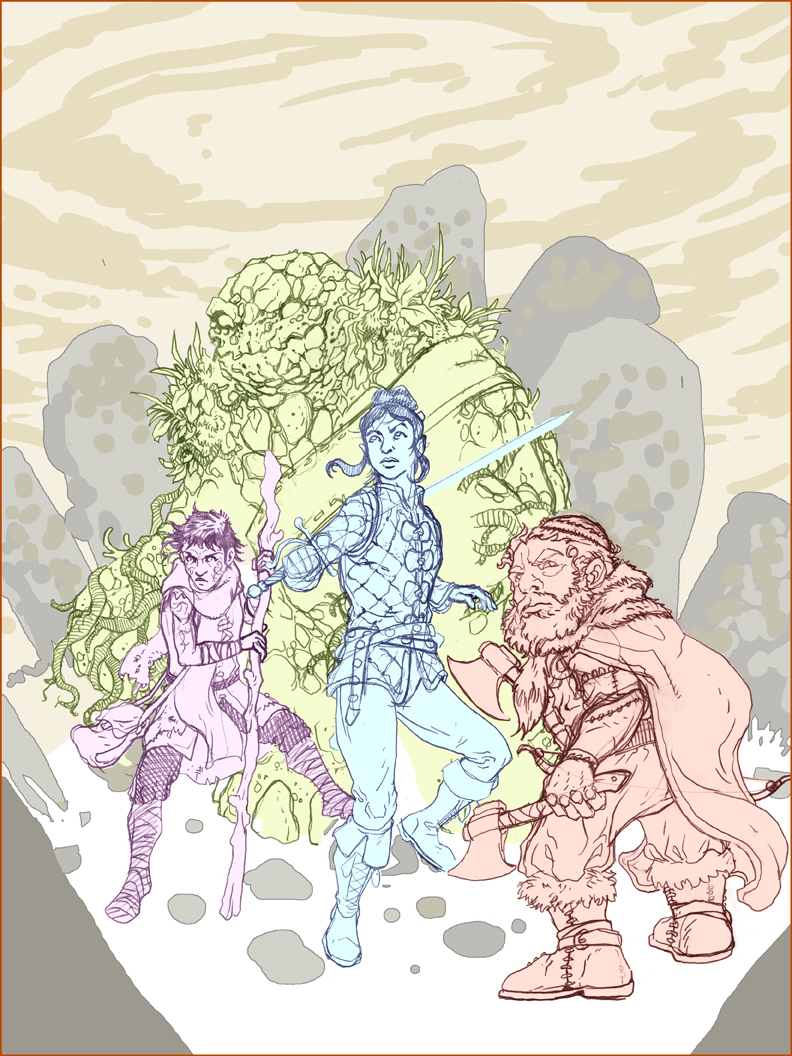
Thorin commissioned me to do a piece from a moment in the first book's story that he could also use to make some tee-shirts or prints for the RPG community helping him develop the setting. I opted to make it possibly serve as a book cover, which you can see with mock-up text on the left. Below I'll go through the process of creating the illustration.

Thorin provided me with a lot (and I mean a lot) of reference ideas for each character. In addition to written physical descriptions, he also shared something akin to a mood board for the clothing, hair styles, and weapons for them all (including characters not appearing in this illustration--in case I opted for a different scene from the book).

I'm not known for drawing humans very well, so I did struggle with getting the pencil drawings correct. I looked at some photo reference for faces and drew each character separately. The rocky character had some wiggle room in the visual design (though Thorin did provide me with rock formations and petrified dinosaur scales for guidance)...I do regret how much I inadvertently used the Batman the Animated Series Clayface design. I assembled the drawings, tinted them all differently and did a quick blocking painting for the rocks and sky.

The layout was printed out on copy paper (this piece was 11" x 14", so it took a few sheets taped together) and I taped the printout to the back of a sheet of Strathmore 300 series bristol. On my Huion lightpad I was able to see through the bristol and use the printout as a guide to ink from.

I used Copic Multiliner SP pens (the 0.7 & 0.3 nibs) to ink everything. I was very caution when inking the faces because if I was just a little bit off, it would ruin the character's expression. I used the finer nib for the faces and the larger nib for more of the costuming and outer contours. 

Even though I knew I'd ultimately be coloring the piece, I wanted to be sure the artwork worked in black and white, so I tried to be hyper aware of where the dark spots and textures were going so I didn't overwhelm the piece with visual clutter.

Once the inks were finished, I scanned them back into Photshop to start the coloring. This first step is called 'flatting' where all the base colors are established. It's a professional version of coloring-in-the-lines. Some of the ideas of the colors were established in Thorin's descriptions, but picking exact colors was a dance I had to do to make sure everything read well while also looking harmonious (like they are all in the same place). Originally I was going to go with a yellow sky like in the rough, but opted in this stage to play with some pink-to-purple gradients to make the setting more ominous.

I also established some color holds (areas where I want the lineart to be a color other than black) mostly on the swirling clouds, but also on one of the character's upper lip and on the dwarf's bow string.

Here again is the final colored art (sans text). The rendering was done mostly using the dodge and burn tools with a stock textured brush.

To find out more about Nadra, you can visit Thorin's website:
www.thorinfinch.com/nadra/


Blog Archive