The fourth installment of The Black Axe came out a few weeks ago, so I consider that enough time passed to show the process on one of my favorite pages from the issue. So if you have not read the issue yet and/or are waiting for the hardcover, consider yourself warned that you may want to turn back now and come back for next week''s post
***Spoilers Below***
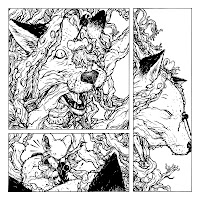
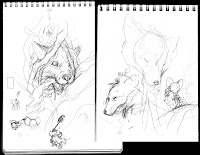 In this page Celanawe finally kills the Fox he's been sent to murder. I started with these sketches across 2 pages in my sketchbook. I knew this scene would be broken into three panels: the anticipation, the death blow, and the calm after the storm. With the Black Axe such a big heavy weapon, I have to be visually careful when it strikes a foe. With a sword, I can minimize the gore of the strike and still have it be a believably dangerous wound, but with the axe, it's harder to hide the horror. As usual, I'm free forming little drawings that I feel tell a moment in the story. I'm not looking at panel shapes or layouts at this point, or at best, only vaguely aware of what shapes I'd like the panels to be, but letting the sketches dictate themselves at first.
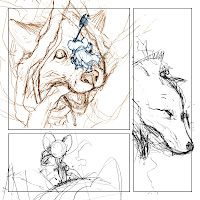 I scanned my sketches into Photoshop where I have a template made for the panel sizes (and if this page had dialogue, it would have the text placed as well) I decided to give the largest panel to the anticipation. That look in the Fox's eye knowing she's trapped and that she is about to die, is a psychological trigger so that I can ease up on the death blow panel and show less. That death blow panel is the smallest and shows Celanawe more prominently than the victim. At one point I had the 'camera' the other way around, but it would have been too much of a repeat of panel one and I liked focusing on the intensity of our hero's face, his swing, his body language, & get you to think about what this fight cost him (I won't further spoil what happened a few pages previous, but for those who have read the issue, you know what I mean.)
When the layout stage is all done and I've composited, resized, rotated, and mirrored all my sketches into the flow I want, I print them out at actual size. Using a lightbox (where I can see the printouts through the bristol board of the final art) I ink the page with the printed sketches as a guide. You will notice the vines are not as well defined in the sketches above. I save all of that for the inking stage. Some of them I will pencil directly on the page, but a lot of that comes out in spontaneous inking. Interweaving things at random intervals is something I can do on the fly. It looks complicated to some, but it really is just draw a vine for a bit and then stop to have another cross it. In the last panel, I left a bit of open space, this was a visual cue of the weight being off Celanawe for a moment, a brief respite for him and your eyes of the visual tangle I'd kept you in for so many pages.
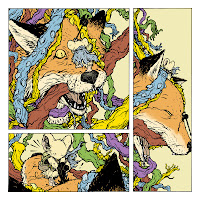 After the inks are done, I scan them and start the first stage of coloring called 'flatting'. This is where you are establishing flat colored areas to distinguish one thing from another (the fox's head from her eye, Celanawe's fur from his cloak, or even one vine from another.) The character and background colors are all fairly close to the final colors because I was carrying over the palette from the previous pages, but for the briar, I used radically different colors. This was so I could see that I was getting a good distribution color value between the vines. If I started with them all vine colored, it may have been difficult to see if I had accidentally colored outside the lines of one and into another since the values are so close, but with red and green and yellow, it was easy to see that I stayed in my boundaries and didn't overlap too many of the same colors.
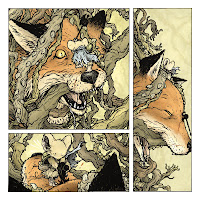 The last step for this page was to render (shade, texture, and highlight) the flat colors. I use the Dodge & Burn tools in Photoshop for this almost exclusively. The briar tones were pulled in from a previous page, swapping each of the bright colors from the flats with five subdued colors. To get the thorns a lighter shade relative to the vines they are on, I made a layer with the thorns painted in and set it to screen. That way it just lightened whichever vine color was underneath it. The vines in the far background of the last panel were painted in digitally and then smudged and blurred to allow that space to feel open but not blank.
2012 Appearances:
FCBD: Jetpack Comics: May 5th
Heroes: June 22-24
San Diego Comic Con: July 11-15
Baltimore Comic Con: Sept 8-9
New York Comic Con: Oct 11-14
Detroit Fanfare: Oct 26-28



5 comments:
Really glad I found this stuff. Can't wait to get my hands on it to read. Even inspired me to sketch a few mice myself. Are you doing your inking right into photoshop? If so are you using a custom brush at all?
Dp, how do I send fan art to you?
Blitz55: I ink everything by hand using Copic Multiliner pens.
Conner: go to mouseguard.net and click on 'contact' for email and mailing adresses
email is complicated for me, I don't get along well with computers, so here is a link: http://www.terrariaonline.com/threads/long-live-the-weasel-kingdom-my-statue-entry.85676/
Well I just bought the first book today at Barns and Noble. Looking forward to giving it a read.
Post a Comment