Tuesday, April 25, 2023

Recent Toned Commissions

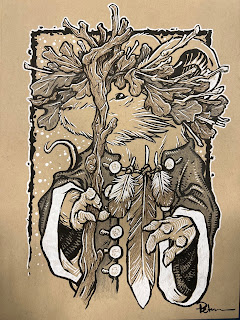
  I've finished all my recent toned paper commissions from Emerald City Comic Con:


Hellboy


TMNT's Slash


Saxon


Mouse Cleric


Mouse Nurse


Mouse Wizard


Usagi Yojimbo


Nature Mouse


Mouse Mead Maker


Pomegranate Mouse


Leaf-masked Guardmouse


Dwarf with a fez


Beagle Pet Portrait


Rand


Tuesday, April 18, 2023

Fir Darrig

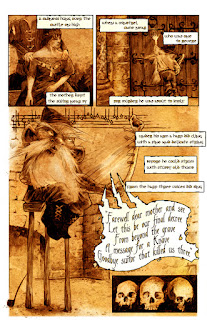
Before Mouse Guard, I did a 4 page story for a publication my college Art History Professor was putting together called 'VOICES'. This was 2003/04. I was given 4 pages to do whatever I wanted to do. I decided to do a prologue to a folklore series I had an idea for based on the folklore character Fir Darrig. As a traditionally mischievous character, I wanted to force him to be the helper character that I could insert into a retelling of any folklore tale I wanted to adapt.

To the left you can see a mock cover for the first story I wrote for him (in which he steals a cloak of darkness, a sword of light, and a purse of plenty from three giants to help a young peasant marry above his station)

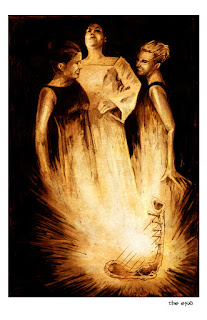
Below you can read the Prologue as well as a follow-up 8 pager of a common folktale where I used lots of Photo reference of Julia and my Sisters-in-Law for the three sisters.

Prologue:


Harp of Sorrow:


As I said at the top, the Snow, Crow and Blood story was the original one I wanted to adapt, where Fir Darrig acquires three magical items of giants that all help with the three tasks of the wicket princess whom the peasant boy wants to marry. In those tasks Fir Darrig, steals from her, throws a feast, and goes into hell and slices off the lips of the devil!

In the notes of that story, I also wrote that I wanted to do a tale with Black Annis, a blue faved witch who steals and eats children as well as a sidequest for Fir Darrig to obtain Iron Boots (which I think was both a homage to Mike Mignola's Helloy story 'Iron Shoes' as well as a way for Fir Darrig to walk along the bottom of a lake or the sea.)

I once pitched this as a comic after Mouse Guard's success, but there was worry about my time management and pausing Mouse Guard for an unknown. We also wondered about doing it as an anthology with different artists taking on each folktale I adapted for Fir Darrig--but again worry about the work involved (herding cats) with anthologies, not to mention the similarity to the Jim Henson's Storyteller comic Archaia was putting out.

Perhaps someday, I'll find a way I'm happy with to bring these tales and new ones as well to an audience.


Tuesday, April 11, 2023

Ornate Saintly Dragon

Last Friday on my Twitch Stream, we did the #DiscoveringDragons Community-Draw-Along! It's a fun event where I welcome all skill levels to push their pencils (or whatever tools they use to make art).

I worked on my piece live on my Twitch stream while viewers worked at home and then on Monday we shared our finished pieces.

Here is my finished colored Dragon. And below are my steps to create it as well as the community submissions.

For #DiscoveringDragons, I post two or three prompt words for everyone to make into a dragon. It's a nice framework for artists of any skill level to focus some time on an 'assignment' to shake the rust off or get the pencil moving again––all while also being loose enough that there's plenty of room for individual expression and interpretation.

This month the prompt was only two words: Ornate & Saintly. I opened a few tabs of google image searches of ornate patterns, saint icon art, and specifically a puppy being held up belly forward. 


I started with a pencil drawing on copy paper of the form of the dragon with that puppy belly facing us and the little hind legs curled up--then I worked on a head shape. But for the most part, I only drew half of the dragon. Because I then scanned in and in Photoshop, was able to mirror the existing side to form the other. In this stage I also added in some stock ornate designs and patterns found in google search results to make a halo as well as a wing texture.

I then printed it out so I could do the tighter pencil drawing you see to the left on top of it on a light pad.

I taped it to the back of a sheet of Strathmore 300 series bristol. Using a lightpad, I was able to see through the surface of the bristol as I inked the dragon. I used Copic Multiliner 0.7 & 0.3 SP pens to ink the art. 

I knew the entire piece could become too busy with all the ornate patterning and jewels and halos, so I tried to keep the linework and texture as simple as I could.  It was close, but I was able to finish my piece while I was still streaming.


At the end of my stream I'd wished the viewers all luck with their pieces and told them we'd take a look at everyone's work on Monday. After some dinner, I came back up to the studio and started the coloring process. That first step is to flat in the colors––basically professional coloring-in-the-lines.

I played with all sorts of color combinations keeping the idea of using red and gold (especially gold with the saint icon imagery). In the end, I liked having more of the warm saturated color in the halo and jewels and made the dragon more pale (which also emphasized some saintly age). I added a few color holds (areas where I want the ink lines to be a color other than black) to the halo design as well as to the flame and wing pattern.


 For the final colors and all the highlights, shading, and texture I used the dodge and burn tools with a stock photoshop texture brush. Below you can again see the final rendered dragon.


But, as this is a community event, I wanted to share all the other entries posted in the Discord.


88UncleErnie


Anelalani


Doombot2015 WIP


InkyPencil


JoDudeIt


Nate Pride WIP


Nuvalo WIP


Pendrake


redSkwrl


ShakeZula WIP


TowryGames WIP


Tyberius WIP


WickedGoblinKing


Tuesday, April 4, 2023

Coin Stickers Process

I've made some new Mouse Guard stickers for sale at conventions and in my online store. In the past I'd avoided stickers as a product, partly because in the paperwork of some conventions they have a clause that if your stickers are found defacing the building, sidewalks, or public property around the convention center, you would be charged for the cleanup. I'd never heard of anyone ever having to pay, but it was still a discouragement. 
 
But over the years, I've seen more and more people making stickers, and had some requests for them––so it seemed past time to offer some.


The art on these stickers was inspired by the seal of Thomas Beauchamp, 11th Earl of Warwick: 
https://en.wikipedia.org/wiki/Thomas_Beauchamp,_11th_Earl_of_Warwick.

However, my mousified version was never intended for these stickers––it was going to be the 2023 Bookplate. After drawing it though, I wasn't convinced it would be right for that product and realized it would work perfectly for a 4" round sticker.


I penciled the art for this on a few separate sheets of copy paper. I started with the mouse, using the pose and armor stylings from the Earl of Warwick seal. Then, instead of a horse, I drew a sparrow. I regret bending the tail feathers up right at the origin to get them to fit in the circle, I should have curled them around––while stylized, they would have looked less 'broken'. on the last sheet of copy paper I drew the bird's rigging and regalia. 

The circles were drawn in Photoshop where I combined all the paper drawings and added in the 'Hail Those Who Are Able The Guard Prevail' text.

The above layout was printed out and then taped to the back of a sheet of Strathmore 300 series bristol. On my Huion lightpad I was able to see through the surface of the bristol to the prinout and use it as a guide to ink on. The pens I used were Copic Multiliner SP pens (the 0.7 & 0.3 nibs).

In trying to make this look like a cross between an engraving and a relief print, I went with bold outlines, and stylized textures. It was while I was inking this I started thinking 'This could be a coin'...which stuck with me when starting to color it...


When I scanned the inks and started to color the pieces, I flatted in an orange color first, with the idea I could render it to look like a copper coin. I used the dodge and burn tools in Photoshop to get the rendering effects and dropped in a photo of tarnished copper to get the verdigris effect. I liked the coin version, but thought it would be nice to see it colored traditionally as well, so I did––and both versions are now available as 4' stickers in my online store:

Blog Archive