Tuesday, May 31, 2022

Ankur - 2nd of the Black Axe Wielders

For a new 10 piece print set, I illustrated all of the past wielders of the Black Axe from Bardrick to Celanawe. I'd shown and listed the wielders in the Black Axe book--but they were only ever visualized as embroidery details on the Adana Tapestry––and I wanted to give them a more solid design existence. The set of ten 4.75" x 4.75" prints is available for sale in my online store and comes in a vellum envelope:

https://mouseguard.bigcartel.com/product/wielders-of-the-black-axe-print-set

To the left you can see the finished art for the BAnkur, Second of the Black Axes print in the set. Below I'm going to go through the process to create the art.

Layout:
I started with a pencil drawing of Ankur on copy paper, and unlike much of my work, I did this drawing all in one go--no extra sheets for the background drawing, just a quick digital color blocking pass after drawing.
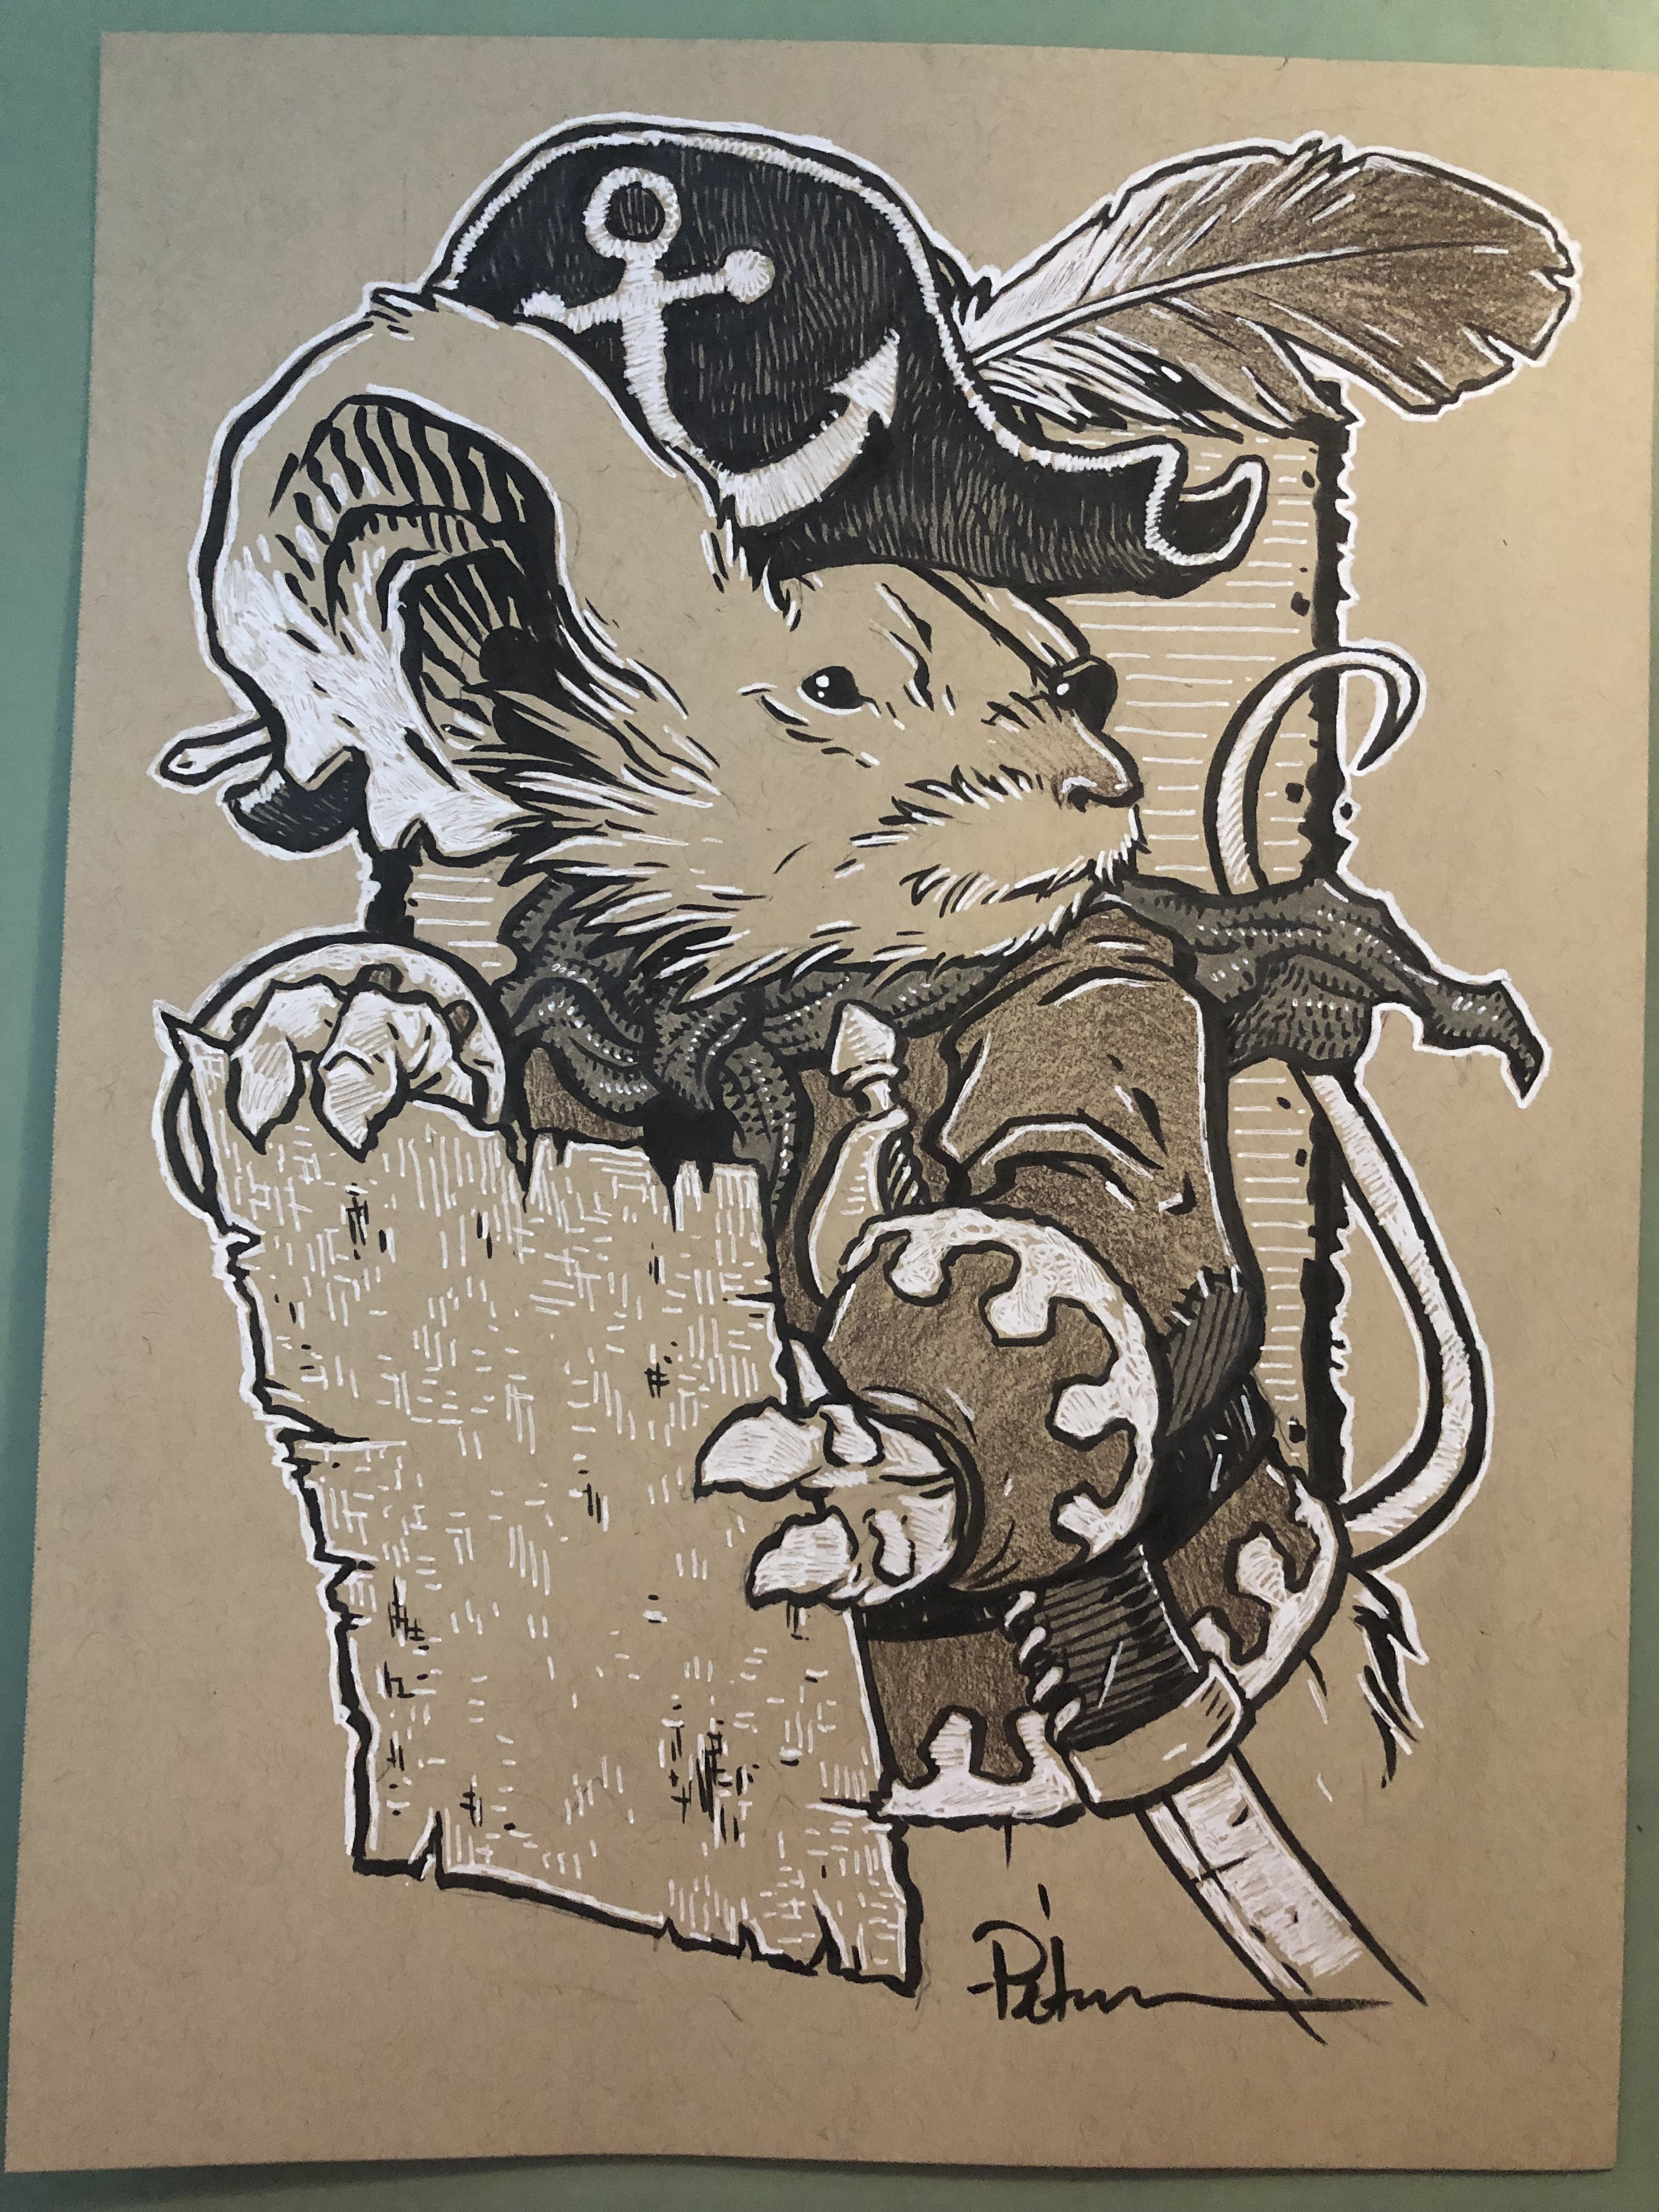
On the Adana Tapestry, Ankur is shown with a scale mail pattern on his clothes--and instead of making regular metal armor, I decided to go with a pinecone seed look––something a rugged outdoors mouse sourced and assembled himself. The stitching on the helm and the eyepatch also suggest an worn existence. The other theme of this piece was to do a Winter scene.

Inks:
I printed out the above layout when I was happy with the arrangement and taped that printout to the back of a sheet of Strathmore 300 series bristol. On my Huion Lightpad I'm able to see through the bristol to the the printout to use it as a guide to ink from. I ink with Copic Multiliner SP pens, and I used the 0.7 & 0.3 nibs for this piece.

Knowing the snow would be atop every branch, I decided to inking in the bottom area with some dense texture to give contrast. I also avoided bringing the background line art right against the flame of the torch or the numeral '2' to help in the next step as well as give some depth of field.


Color Flats:

When the inks were done, I scanned the art and brought it back into Photoshop to start the coloring process. This is the step where I 'm basically just filling in each area with flat color. In this step I also establish the color holds, areas where I want the ink work to be a color other than black. In this piece that consists of The snow, the flame, and the number 2.

Most of the colors were either plucked from the Adana Tapestry or established in my rough layout

Final Colors:
The final colors were rendered by using the dodge and burn tools in Photoshop (and a textured brush) to add shadows, highlights, and textures. I select areas and play with the color balance to shift colors in some areas.

I added the falling snow snow and the torch glow effects on separate layers 

The entire 10 piece print set is available in my online store: https://mouseguard.bigcartel.com/product/wielders-of-the-black-axe-print-set

Tuesday, May 24, 2022

Mouse Carpenter

I've released a new Mouse Guard sketchbook titled "Alone Together" (https://mouseguard.bigcartel.com/product/alone-together-sketchbook) The majority of that material is inked commissions I did during last year's ONLINECON event. But to round out the sketchbook sometimes I need to generate some material of my own both to fill up pages and to add certain tone or subject for a thematic through line for the work in the book

To the left you can see one of those pieces finished and colored ready for a page in that sketchbook––and in this blogpost I'll break down the process to get there.


Layout:

Already knowing the sketchbook's title 'Alone Together' was a reference to going through the pandemic, I wanted to show a few hobbies/crafts I'd done in that time. To medieval-mousify it, I looked at a few primitive woodworking claps/vices/mules, and then designed my own that would use the mouse's full sitting weight as the clamping pressure. The mouse and mule were drawn on separate sheets of copy paper and placed together in Photoshop. I printed that out within a square frame and then on a lightpad drew the background elements on another sheet. Once all digitally assembled I tinted the background a different color to help me see the forms (I also digitally drew in some forms for ropes loosely hung from the woodworker's structure.


Inks:

With the above layout finished, I printed it out and taped it to the back of a sheet of Strathmore 300 series bristol. On my Huion Lightpad I was able to use the printout as a guide to ink from. I used Copic Multiliner SP pens. I did all of the inking on this one with the 0.7 nib using some pressure variance to get the lineweights and details. I have a 0.3 nib I sometimes use on really fine bits (especially if a mouse's face is small in the image) but I didn't use it here. The trick for these inks were to differentiate the various piled elements and planes of the wood, tools, planks, etc, and that was mostly done with different densities of texture.


Color Flats:
With the finished inks scanned I could start on the coloring process. The color flats stage is just coloring in the lines with flat colors, establishing what every major area's base color is––no rendering, no textures, no effects. Because in the end I knew the differences between so many of the forms would be subtle and low contrast, I started with crazy color selections. Green for planks of wood standing upright, purple for the mule clamp, royal blue for the stumps, bright yellow for the wood shavings...once everything was filled in, I could start easily swapping those colors for hues and values closer to what I wanted, dialing in those slight changes so you could see the objects as differently colored from one another.


Final Colors:

Using Photoshops's Dodge and Burn tools (as well as a stock textured brush) I added all the shadows and highlights. In some places I shifted colors by selecting areas with a lasso tool and using color balance sliders to get them where I wanted them. I also added a bit of a lighting effect coming in from the background and making a slight corona on the rope, structure, and planks.

This piece is one of the pieces included in the 2022 Mouse Guard sketchbook 'Alone Together' which is available in my online store: (

Tuesday, May 17, 2022

Recent Toned Commissions

I've finished all the toned paper commissions from ONLINECON 2022. In addition to opening up commissions for sale, I also gifted a piece to every guest who appeared on stream. I streamed drawing most these on my Twitch Stream.


Orren, the 4th Black Axe

A Degu homage to a photographer Grandfather

A Veteran Guardmouse Minder 


Usagi Yojimbo


A Ghost Owl


Pet Portrait of 'Chewy'

Mouse with Owl armor


Rand

Lieam


A Mouse Graduate


Catbus


Remy of Ratatouille


Master Splinter from TMNT


'Skeptical George' as a Gnome


French Bulldog in armor


Pirate Mouse


Librarian Mouse

Usagi Yojimbo (homage to Albedo #2)


Mouse Brain Surgeon


Happy Usagi Yojimbo


Ming the Merciless


A Mouse named 'Rose'


Mouse Samurai


Mouse Microbiologist


Bagpiper Mouse


Frog Monk Warrior


Mouse Librarian


A Mouse loving reading


Mr. Mole


Mandolin Mouse
For Guest Eoin McCartan


Mr. Bojangles from Kukuburi
For Guest Ramon Perez


Gilbert Luther
For Guest Jeremy Bastian


Celanawe
For Guest Javier Garcia Urena


Warduke 
For Guest Dan Larson


Mushroom Creature
For Guest Iris Compiet


The Wheel is not a Cult
For Guest Will Smith


Archangel
For Guest Louise Simonson


Thor from Ragnarok
For Guest Walt Simonson


Manu Puppet
For Guest Barnaby Dixon


Lily Pad 7 recruit
For Guest Conor Nolan


A Dragon Monkey
For Guest Dave Stewart


LEGO Mouse Guard Minifig
For Guest Guy Himber


A Gwelf Rabbit
For Guest Larry MacDougall


A Belgian Gnome
For Guest Matt Smith


A Cork (Corgi+Shark)
For Guest Meg's Mashables


A Baryonyx
For Guest Danny Anduza


Roka from Runners
For Guest Sean Wang


Crow from Crow and Weasel
For Guest Tom Pohrt


Basset Hound
For Guest Scott Kurtz


Mouse Carpenter
For Guest Eric Petersen

Blog Archive