
 I have done the cover for the upcoming TMNT Macro Series issue for Michelangelo issue from IDW. I was lucky enough to be asked by series editor Bobby Curnow to do covers for the 4 issue series (this being the second of which).
I've done several TMNT covers in the past and You can click here for all my past TMNT covers and the process to create them
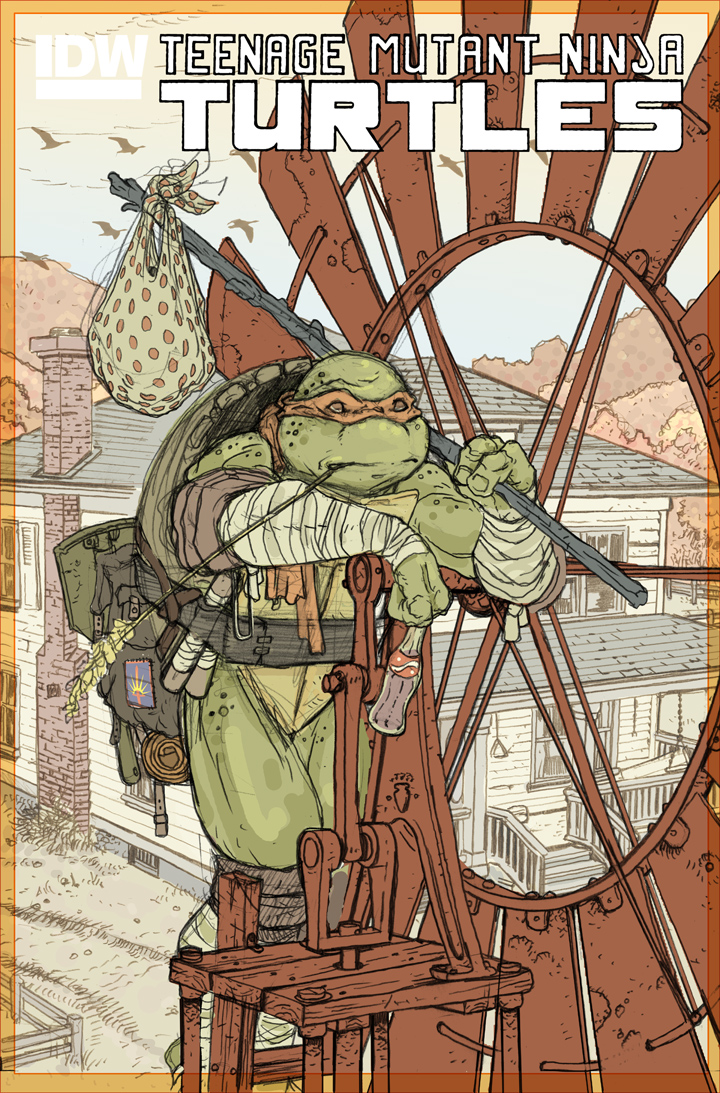
You can see my finished cover art to the left, but below I'll walk through the steps to create the art.
 Layout/Pencils:
Bobby gave me some leeway when it came to the visuals for these covers. I didn't have to do something specifically from the events of the issue and I could do something more 'classic'. After reading the outline, I decided to play on some themes rather than a literal illustration of a moment. The issue deals with Michelangelo struggling with the idea of 'home' in some ways, and wistfully idealizing his 'youth'. So I tried to do a layout that had the nostalgic feeling a Rockwell painting evokes. I wanted to have Mike on the farm, but not rely on the farmhouse architecture as visually interesting enough, and I thought of a windmill...
 For the windmill, I used Google Sketch-up's library to find an already built digital model of a pump wind mill. Every photo I'd find of the type of windmill I was looking for was taken from ground level, and didn't have the details or angle I needed, so the model would be a perfect way to set the position just how I wanted it. While I was there, I also found a farmhouse model to use the geometry for. I redrew each of these elements on a light pad adding or omitting details and getting a feel for them in my own line.
I then discovered that the person who modeled the mill, didn't set up the linkage properly, and that mill wouldn't be able to spin completely around before getting hung up on itself. I had to redesign the mill's works as I was redrawing it.
 Inks:
Inks:Once the above layout was composited together with my drawing of Mike, the mill, and the house (and with some added color to help myself and the editor and license holder visualize what I was aiming for in the final art), I started to ink the piece. The layout was printed out and taped to the back of a sheet of Strathmore 300 series bristol. On a lightpad, I inked the cover with Copic Multiliners (I used the 0.7 nib mainly). On the lightpad I can see through the surface of the bristol to the printed layout and use that as a guide to ink from. This also makes the final art cleaner and with no need to erase or digitally sweep away blue-line.
 Color Flats:
After I finished the inks, I scanned them at 400 resolution on my flatbed scanner. After a little tweaking to adjust the levels of the white and black areas, I did the flats for the coloring process. Flatting is adding in flat un-rendered, un-textured color. It's about establishing color areas, that Mike's skin is a different color than his shell or the sky, and where all of those areas start and stop.
I also added in the color holds at this stage. These are areas where I painted the linework as a color rather than black. Doing this helped add depth with the house, the trees, the geese, and the clouds as well as some lighting & design effects with the patch on his bag, the polka-dots on his bindle sack, and the non-brand cola bottle.
 Colors:
 Here again are the final colors for the cover. To render all the tones I use the dodge and burn tools in Photoshop with a stock textured brush to get that pebbled look.
Oh, I forgot to mention the significance of the patch on the bag. I started out by wanting to give Mike more than just a bindle while he contemplates a life on the road or running away, and I added in that old army backpack similar to one my Dad bought for the camping excursions of his youth. That bag was still around when I was a kid, and a collapsible shovel was also inside it, so I drew it in here...and then I thought I'd add a patch of some group, and decided on the New York National Guard, thinking that wherever Mike got this, from the farmhouse, one of April or Casey's relatives, or somewhere in the city...the NY branch of the civilian soldiers.
2018 Appearances:
Baltimore Comic Con: Sept. 28-30
New York Comic Con: Oct. 4-7


