Tuesday, September 26, 2023

Dorys The Matriarch cook

As part of the new illustrations for a 2024 Mouse Guard Calendar, I did this piece of a Matriarch of the Mouse Guard named Dorys in the kitchens.

Like last year's calendar, this new one will feature half of the months featuring new-for-this-project artwork, while the other months feature existing favorite illustrations.

Below in this blogpost I'll walk through the process of creating the artwork

I'd wanted to draw at least one new piece that had a homey-comfortable-cosy feel, and I'd also wanted to draw a 'real' version of the Matriarch Dorys that appears in stained glass form in the Matriarch's Chamber in The Black Axe book. The character is based on my Grandmother Doris, who is also my inspiration for having Matriarchs as the leaders of the Mouse Guard in the first place. 

A consummate cook, and a lover of purple, I did the rough of her on copy paper, and then drew the background hearth, pots, tables, and ingredients on a different sheet and assembled them together in Photoshop.

I printed the above digitally assembled layout onto two sheets of legal sized paper (taping them together so the image was 11" x 11") and then taped them with painter's tape onto the back of a sheet of Strathmore 300 series Bristol.

On my Huion Lightpapd I was able to see through the surface of the bristol down to the printout and use it as my 'pencils' as I worked. I used Copic Multiliner SP pens (the 0.3 & 0.7 nibs). 

I inked this piece focused mainly on making the background elements interesting while still being able to fade into the background.


With the inks finished, I scanned them into Photoshop and started the coloring process. That first step is known as 'Flatting' and essentially is professional coloring-inside-the-lines. Some of the color palette was established both by the cannon of her stained glass and my layout stage...but there was a lot to figure out with the background in terms of value (light/dark) and saturation.

Here I also established color holds (areas where I want the ink lines to be a color other than black) on her feather, the leaf veins, the flour, her glasses, and the liquids in the pots.

The final step was to render the piece. I used the Dodge and Burn tools in Photoshop while using a stock textured brush. 

Getting that soft glow meant a bit of using the paintbrush tool (something I rarely use) as well as isolating freehand lasso sections with a large feather (blurred edge) and adjusting the brightness/contrast as well as the color balance.

As I said before, the colored image appears in the calendar for 2024


Tuesday, September 19, 2023

Mouse Guard 2024 Calendar

The Mouse Guard 2024 Calendar is now available for purchase! mouseguard.bigcartel.com/product/mouse-guard-2024-calendar.

It's a  12" x 12" thirteen month Calendar spanning from January of 2024 through January of 2025 and includes US Holidays and the phases of the Moon.

Six of the month artworks were specially created for this calendar (and have been the subject of process blogposts here)


Tuesday, September 12, 2023

Bone tribute, Get well soon Jeff Smith

On August 19th the official Cartoon Books twitter account shared the following:

"Jeff Smith is recuperating from a cardiac arrest, which he suffered on Sunday. There will be a long road to recovery, so regrettably we must cancel the remainder of his book tour this year."

Jeff's work, especially Bone, have been a guiding light for all-ages content in the comic & graphic novel space for decades. Jeff's always been a kind and generous supporter and friend, and I wanted to do a piece of tribute art while he's recovering.  


Kathleen Glosan, the production manager of Cartoon Books mentioned that if fans wanted to do any get-well art they'd love to share it as well as if we wanted to mail anything to Jeff she provided an address.

So, I started work on my rough right away. I drew Phone Bone on a sheet of copy paper as well as a mouse arms stretched wide. I then scanned those assembled then in Photoshop and did a bunch of alterations and digital corrections as well as a quickly painted background.

The next step was to print out the above layout and tape it to the back of a sheet of Strathmore bristol. On my Huion lightpad I was able to see through the surface of the bristol and use the printout as a guide to ink from. I used Copic Multiliner SP pens (the 0.7 for most of it, but the 0.3 for the mouse's eye).

It was tricky to ink Phone Bone so cleanly and not add in more texture like I do for most of my contour inking. I then made up for it with the environment.


When the inks were done, I scanned the art and started the coloring process with flat colors. This is the digital step where I clean up the artwork to be crisp blacks and whites and then I lay in flat colors for all of the shapes to establish what areas are what colors. It's a professional version of coloring inside the lines.

Most of the color choices were things I'd already decided on in my layout stage, but I certainly made some subtle changes in hue, saturation, and value to many areas so the whole piece worked together even before I started rendering it.


The last step was to render the color. I use a stock texture brush in Photoshop with the dodge and burn tools (these are carry-overs from when Photoshop was developed as a photo retouching tool and references darkroom exposure techniques). They basically just darken and lighten whatever color(s) they are going over at the time, so that's how I add shadows and highlights. I also select areas (like some individual leaves) and then slide the color balance around to shift the hue to make them look a little more individual and less of a digital mass of the same color.

The original inks have been sent to Jeff, and I hope you all join me in wishing and praying for the best for Jeff's recovery.

Tuesday, September 5, 2023

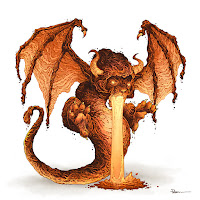
Lava Lion Dragon

Last Friday on my Twitch Stream, we did the #DiscoveringDragons Community-Draw-Along! It's a fun event where I welcome all skill levels to push their pencils (or whatever tools they use to make art).

I worked on my piece live on my Twitch stream while viewers worked at home and then on Monday we shared our finished pieces.

Here is my finished colored Dragon. And below are my steps to create it as well as the community submissions.


For #DiscoveringDragons, I post two or three prompt words for everyone to make into a dragon. It's a nice framework for artists of any skill level to focus some time on an 'assignment' to shake the rust off or get the pencil moving again––all while also being loose enough that there's plenty of room for individual expression and interpretation.

This month the prompt was two words: Lava & Lion.

I opened several tabs of google image searches of dragons, Lava flows, Lions, Stone sculptures of lions, etc.


In my 'Dragon' search tab, I found an illustration for a Magic Card with a dragon flying with the rear legs tucking under it while breathing fire. I used that pose as the start for my piece.

Even before that I knew I wanted my lion headed dragon to be vomiting lava, so the head pose needed to work with that. I sketched the head and body on a sheet of copy paper, and then scanned it into photoshop as I blocked in some wings using clip art as a guide.

When the wing clip art was where I wanted after some resizing, warping, etc. I printed it out and drew lava versions over the top in pencil on a light pad. The entire drawing was merged in Photoshop and tinted to make seeing it a little easier.


The printout was taped it to the back of a sheet of Strathmore 300 series bristol. Using a lightpad, I was able to see through the surface of the bristol as I inked the dragon. I used Copic Multiliner 0.3 and 0.5 SP pen to ink the art. 

The inking on this piece was all about texture and trying to retain some of the subtlety around the lion's face from the pencils (most of which I think I lost). I found that the later pencils on the tail and wings were the easiest to ink, and that might be that they were more open areas, unlike the forms of the lion's face. 

I was unable to get the inks finished before my stream ended but I wished the viewers all luck with their pieces and told them we'd take a look at everyone's work on Monday.

After some dinner, I came back up to the studio and finished inking the piece and then scanned the bristol  to start the color flatting process––basically professional coloring-in-the-lines. First step was creating color holds (areas where I want the ink lines to be a color other than black) for the entire dragon as well as the lighter ones around the eyes, in the wings, horns, and the lava flow. Then I flatted in two colors: the overall creature, and the lighter bits.


For the final colors I did do a bit of painting with the paintbrush tool, but did most of the highlights, shading, and texture with the dodge and burn tools and a stock photoshop texture brush. Below you can again see the final rendered dragon.


But, as this is a community event, I wanted to share all the other entries posted in the Discord.


88UncleErnie


anelanlani WIP


Art Vogt


Capt.Nemo


Doombot79


joedudeit


Jonathan Towry WIP


Nate Pride WIP


Nuvalo WIP


redSkwrl 


sleeplessninja WIP


SummerDragoness

VernNYC


Blog Archive