For this blogpost, I'll share of of the pieces in that sketchbook and show the process steps to get the artwork completed.
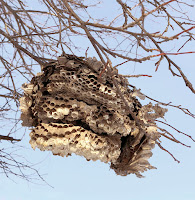
I started by being inspired by this abandoned and broken wasp's nest that was outside of our veterinarian's office the last time we had Coco & Bronwyn in for a checkup.
When I encounter items in the wild that would be an interesting visual in Mouse Guard, I try to take a photo of it...something much easier to do now that cell-phone cameras are of such good quality. I have folders of photos like this I've taken of plants, architectural details, fabric patterns, and certain cloud colorations.
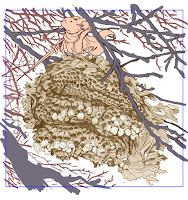
I did a lightbox tracing of a printout of the nest on a clean sheet of copy paper. In this stage I was translating the forms into the mark-making that I do, while also doing some visual editing––removing unnecessary details, simplifying & unifying patterns, and removing excess branches to get some visual focus. On a new sheet of copy paper, I drew a mouse looking weary. Once these two pencil drawings were both scanned and tinted in Photoshop, I was able to digitally add some color to block in shapes, including the far away branches.
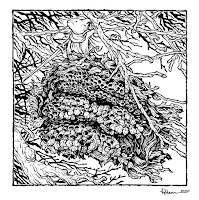
The above layout was then printed out and taped to the back of a sheet of Strathmore 300 series bristol. On a lightpad, I was able to ink the piece with Copic Multiliner pens (the 0.7 for almost everything except the mouse's face that I did with the 0.3). The lightpad allows me to see through the surface of the bristol down to the printout which I use as my 'pencil' lines to guide me.
Because I knew the far branches were going to be painted as color holds when I colored it, I avoided inking those lines up to anything in the foreground (or the border) to help with isolating them.
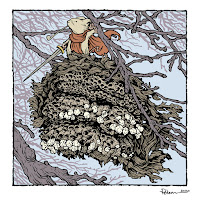
Once the inks were finished, I scanned them into Photoshop to start the coloring process. This part is called 'flatting' where I just add flat colors (no rendering, gradients, effects, etc) to establish where colors start and stop...which part is hive and which part is mouse, etc.
I used roughly the color palate of the original photo, and then gave the mouse a red-orange cloak to help them stand out in the muted cool tones of everything else.
As I mentioned in the inking stage, I applied a color hold (an area where I want the inkwork to be a color other than black) to the far away branches.
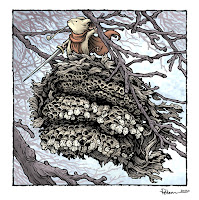 The last step was to do all the texture and rendering to the piece. I do most of this with one stock textured brush in Photoshop and the Dodge and Burn tools.
To the right you can see the finished piece––which will also be soon available in print in the upcoming Mouse Guard sketchbook Dawn, Daye, & Dusk.


1 comment:
I grabbed the digital sketchbook because I missed so much and wanted to catch up. Based on images like this I am really looking forward to the upcoming sketchbook. I am really interested into the lore and fiction and primarily want to use the images as a prop for the Roleplaying Game with my kids. Curious what purpose the guard would have for an abandon hive. Pretty neat!
Post a Comment