 Weekly Blogging:
If you haven't noticed, I'm trying to update the blog more often than I have in the past. I was posting at a 1 per month rate before, but decided to up it to 1 per week. I'm certainly no James Gurney, and can't imagine doing a daily blog, but the weekly schedule seems do-able.
 FCBD '09 process:
I just sorted through a bunch of sketches I had in a drawer to find some examples of my process. I'm reluctant to share pencils usually, but I think I have a few weeks worth of stuff to share. This week I'm showing the progress on the Free Comic Book Day print from this year.
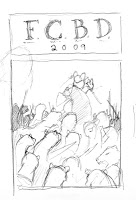 Having done a FCBD print the year before, I had established a format: 5.5" x 8.5" print with 2 panels, a scene and the letters FCBD and the year. Here is my rough sketch. It's only a few inches wide in my sketchbook. My idea was to show Saxon, Kenzie, and Rand fighting weasels (a nod of stories to come). I was concerned here with the shape of the mass of weasels and the mice as a final focus.
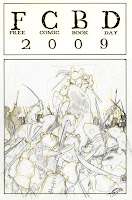 The next step was to scan and enlarge the thumbnail to working size (about 6" x 10" for the images). I printed out the rough at size and then using a lightbox, tightened up the pencils on a new sheet of paper. You can see the rough as yellow lines in the image here. Note that I also used a font for the layout of the text here.
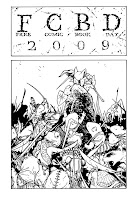 Once I liked the tightened pencils, I threw a sheet of bristol on the lightbox with the pencils underneath. I inked directly on to the bristol. This way I never get any pencil on the final art. I'm finding I like using this method lately. It means being tied to my studio to ink over the lightbox, but allows me to have cleaner final artwork. As for the "FCBD" portion, using the printed font as a guide, I was able to distress the text and add stippled texture.
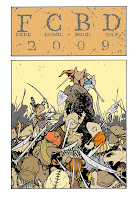 I then scanned the inked artwork and started coloring in Photoshop (I'm still using 7 cause I like it and "if it ain't broke..."). This stage is called 'flatting' Not only am I selecting an overall palette here (which sometimes can change again before the final colors) I'm designating which areas are broken by color. I tend to do this on multiple layers labeled things like 'mouse fur', 'clothing 1', clothing 2', 'weapons' etc.
This is also the stage where I select linework that will get a 'color hold' ie: linework that will be printed as a color as opposed to black.
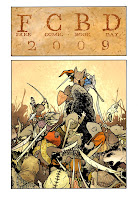 The final colors get rendered and tweaked. With this composition it was important for me to make the weasels a mass, but also have each weasel 'readable'. You needed to be able to tell where one ended and the next began. I also wanted to really help the mice be the focus, so I added the lightness to the background and color hold behind them.
Next time I plan on showing more overlay/lighbox sketch/layout techniques.
 Detroit Comics Book Club:
This Friday (Sept. 25th) I'll be a guest at Detroit Comics in Ferndale, MI as they discuss Mouse Guard Fall and Winter 1152 from 7PM to 9PM. The plan is to have a real conversation about the books and story and the creation of the artwork and not to wander off into various other topics. I'm excited to talk about character motivations, places I feel the book fell short, or how little story threads tie together. With that in mind, I won't be doing any drawings or sketches at this appearance, I want to focus on the book club conversation.
September Ypsi Ink & Stein:
 It's that time again, the last Saturday of the month! For those unfamiliar, a group of artists and writers gather at the Corner Brewery in Ypsilanti the last Saturday of every month from 7pm 'till close. The idea is to come and work, make connections, bounce ideas off one another, and to inspire and be inspired. If you live in South-Eastern Michigan and want to join us, you are more than welcome!
 Fan Art:
This week comes from Sandra Becker. You can check out her work by clicking her name. Thanks Sandra!
Upcoming Appearances:
Detroit Comics' Book Club: Sept. 25
Long Beach Comic Con: Oct. 2-4
Baltimore Comic Con: Oct. 10-11
Big Apple Con Oct. 16-18


14 comments:
This is really, REALLY cool! I particularly love this image that you've used as an example. It's really interesting that you ink the final art directly! In a way that's also cool because then you get to keep the pencils too! I admit my two favorite steps (besides the finished, colored piece of course) are the tightened pencils and the inked, uncolored art. I absolutely love seeing pencils (especially with blue lines or in this case, yellow lines)!
Very awesome blog this week and look forward to more "behind the scenes" and "process" stuff like this, especially your promise of more about the lightbox techniques!
I'm lucky to have CS4 at work, but at home I still use Photoshop 6 :) And when I consider how much I can do with it, because of how long I've been using it, the "ain't broke" thinking definitely applies.
How could I forget to mention how awesome Sandra Becker's fan art is! If Mouse Guard was a children's storybook, I can imagine that this is what the art would look like!
I still use PS7 myself, as you say David, if it works well still for all your needs, why upgrade? :)
Seeing the shot of last year's FCBD print reminds me that I don't have it, I figure there's little chance of acquiring or tracking one down now I guess...
Do you keep or save your color palette in swatches in Photoshop, or do you adjust the colors independently on the page and "wing it"?
Thanks for the peek into how the process works. I always enjoy learning about the process from idea to final product and how different each artist is.
Wonderful! I always love seeing how different artists come to a final product. And I feel I must ask, what do you ink with?
It's amazing how much the finale coloring adds to it.
Black and white is cool because it's original and you can see the nice inking. Then, the initial coloring is rather boring. Then, the completed coloring makes it really captivating.
Brandon: In a lot of cases, the question of penciling on the final bristol comes down to how much I like my sketch/pencils. In this case, I didn't think that redrawing the composition again would add anything (more likely it would take away).
Mayhem: I'll check and see if I can bring one to the UK with me.
Bo: I don't save palettes. I'll eyedropper a past page, but as the colors change throught Mouse Guard because of weather, atmosphere, tone, etc. I can have some flexibility.
Adam: I use uniball Vision pens. They are waterproof and fade resistant
You use uni-ball vision pens?! Makes sense now that I think about it, all the detail that goes into your images. I love how "fluid" and yet precise they are. LOL awesome... those are totally my favorite pens! I don't buy anything else!
You're coming to the UK David - business or pleasure?
John: Mostly pleasure, but I will be making a signing apearance at Forbidden Planet in London on the 7th of Nov.
I'll have to be in London for that one! Will have to bring my B&W and the Dark Crystal print to sign.
Maybe time for a mouseguard in the UK picture - Big Ben or Nelsons Column perhaps!
Thanks for that David, I hope you can find one. And glad to hear that I could help facilitate a signing in this country to boot :)
Thanks for sharing your process David! It was very informative and I love seeing how the detail is developed. I'm also a big fan of Photoshop 7.0! I even have an unopened copy of the CS3 version that my cousin got me. . but I just like the familiar interface of 7.0 too much hehe.
Post a Comment