Tuesday, August 30, 2022

Ivonne - 8th of the Black Axe Wielders

For a new 10 piece print set, I illustrated all of the past wielders of the Black Axe from Bardrick to Celanawe. I'd shown and listed the wielders in the Black Axe book--but they were only ever visualized as embroidery details on the Adana Tapestry––and I wanted to give them a more solid design existence. The set of ten 4.75" x 4.75" prints is available for sale in my online store and comes in a vellum envelope:

https://mouseguard.bigcartel.com/product/wielders-of-the-black-axe-print-set

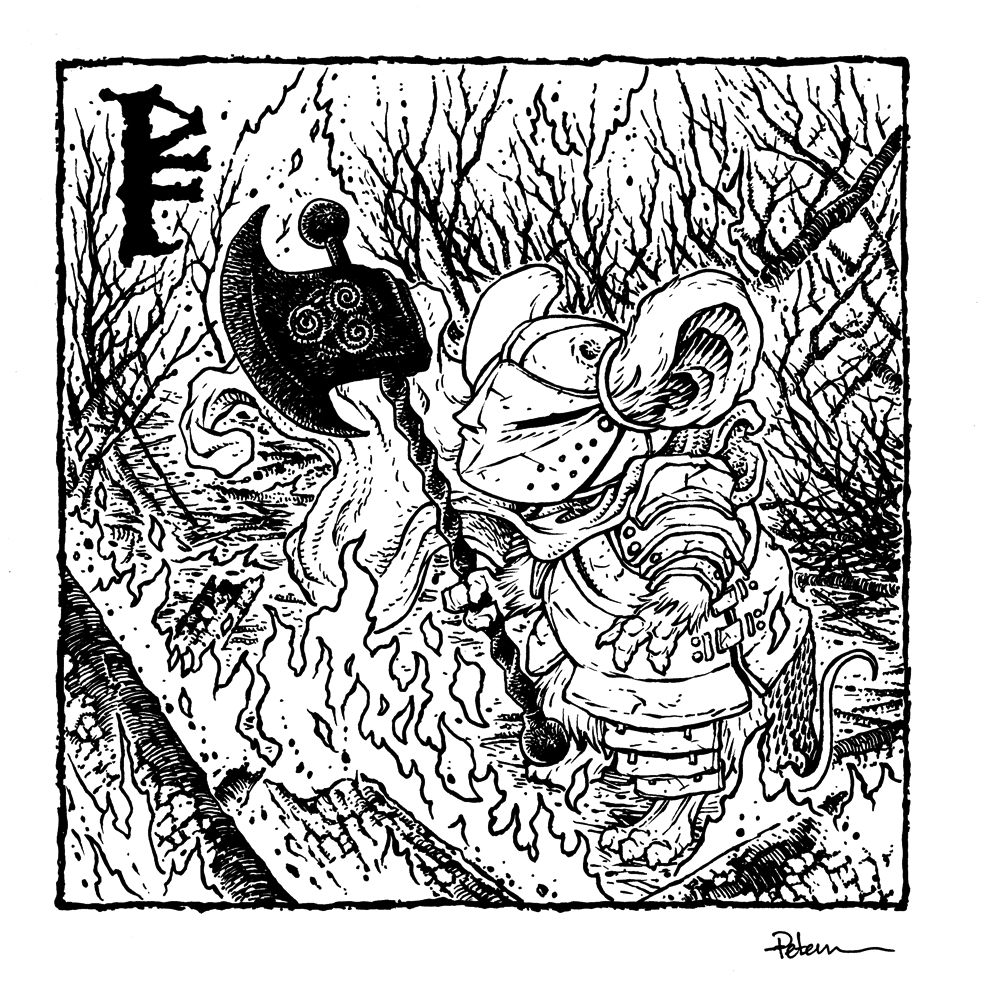
To the left you can see the finished art for the Ivonne, Eighth of the Black Axes print in the set. Below I'm going to go through the process to create the art.


Layout:
The Adana Tapestry image of Ivonne is pretty plain--just a brown mouse with a red cloak--no other clothing or decorative cues. So, for this piece I took some liberties to make her more interesting with details like a tartan cloak and clothing embroidery and scars. I drew her on copy paper with the idea that she's standing on a dead weasel, though I drew that weasel (as well as the axe) separately on different sheets of paper. In Photoshop I merged all three drawings as well as a runic number '8'. Tinting them each a different color helped me see which line belonged to which drawing so I could easily clean them up and scale everything appropriately.


Inks:
I printed out the above layout when I was happy with the arrangement and taped that printout to the back of a sheet of Strathmore 300 series bristol. On my Huion Lightpad I'm able to see through the bristol to the the printout to use it as a guide to ink from. I ink with Copic Multiliner SP pens, and I used the 0.7 & 0.3 nibs for this piece.

Besides my normal desire for interesting line weights and textures, the only trick here was to leave a gap around the tartan plain pattern on her cloak from the contour lines of the form & wrinkles.


Color Flats:

When the inks were done, I scanned the art and brought it back into Photoshop to start the coloring process. This is the step where I 'm basically just filling in each area with flat color. I made the cloak red, but with a gold plain pattern, and then used a grey-green for her main clothing palette. In this step I also establish the color holds, areas where I want the ink work to be a color other than black. Here I pushed all the background flower lines back, added the above mentioned plaid & embroidery, her scars, and the numeral '8'.


Final Colors:

The final colors were rendered by using the dodge and burn tools in Photoshop (and a textured brush) to add shadows, highlights, and textures. I select areas and play with the color balance to shift colors in some areas.

The entire 10 piece print set is available in my online store: https://mouseguard.bigcartel.com/product/wielders-of-the-black-axe-print-set

Tuesday, August 23, 2022

Bricks of the Mouse Guard 3 Kickstarter

Once again we've partnered with Guy Himber at Crazy Bricks to make more Mouse Guard themed minifigures! The 3rd Kickstarter that blends the worlds of LEGO and Mouse Guard together launched today: https://www.kickstarter.com/projects/crazybricks/bricks-of-the-mouse-guard-3

Please take  a look at the campaign for all the new and returning offerings as well as parts like weapons, accessories, and individual mouse heads.

Below are images of the brand new mini figs from the comics we are offering:


Bilbin from The Owlhen Caregiver


Farrer the Blacksmith


A Mouse Minstrel


Rand of the Guard


Rosard of the Guard


Sienna of the Guard


 Stejpan of the Guard


Tuesday, August 16, 2022

Mouse Insectrist

I've released a new Mouse Guard sketchbook titled "Alone Together" (https://mouseguard.bigcartel.com/product/alone-together-sketchbook) The majority of that material is inked commissions like this piece. I don't often open up a list for these inked commissions, but when I do and someone requests something properly Mouse Guar-y enough that I could include in the sketchbook it helps fill out the next sketchbook's page count.

To the left you can see one of those pieces finished and colored ready for a page in that sketchbook––and in this blogpost I'll break down the process to get there.

Layout:
The request for this was a Mouse Insectrist (a skill/profession in the Mouse Guard RPG) vs a weasel. I started with the drawing of the weasel on a sheet of copy paper, and then on a different sheet of paper the mouse. I placed them together in Photoshop and placed in some quick digital color blocking. I printed that out and on yet a third sheet of copy paper I drew in all the insects. This way I could scan them and make subtle changes (rotation, resizing, symetry, etc) as well as micro-adjust their placements. I scanned those and added them to my digital file and blocked them all in with a very visible green.

Inks:
With the above layout finished, I printed it out and taped it to the back of a sheet of Strathmore 300 series bristol. On my Huion Lightpad I was able to use the printout as a guide to ink from. I used Copic Multiliner SP pens. The 0.7 nib did most of the heavy lifting in this piece and I only used the 0.3 for some finer bits like the mouse's face and some of the insect details. The background was a little blank beyond the rocks, so I added in some dots that in the next step will look more like floating dust particles. 


Color Flats:
With the finished inks scanned I could start on the coloring process. The original inked art was shipped off to the new owner and I worked on this piece for my sketchbook. The color flats stage is just coloring in the lines with flat colors, establishing what every major area's base color is––no rendering, no textures, no effects. Some of the colors for the weasel and the Insectrist mouse were chosen when I was blocking in the layout, but I did have to make small adjustments to those colors (value, saturation, etc) when taking into account the sky and rock colors. Then the insect colors were placed in using their real colors in nature filtered through the color palette I'd already gone with for the rest of the piece. The last step in this stage was to establish color flats, areas where I want the lineart to be a color other than black. The dots in the sky were planned to have a hold, then I decided to add a bit of depth and push the weasel's plane back a touch, and lastly the patterns on wings of the grasshopper and the mouse's cloak.


Final Colors:
Using Photoshops's Dodge and Burn tools (as well as a stock textured brush) I added all the shadows and highlights. In some places I shifted colors by selecting areas with a lasso tool and using color balance sliders to get them where I wanted them.


This piece is one of the pieces included in the 2022 Mouse Guard sketchbook 'Alone Together' which is available in my online store: (https://mouseguard.bigcartel.com/product/alone-together-sketchbook)


Tuesday, August 9, 2022

Tynan - 7th of the Black Axes

For a new 10 piece print set, I illustrated all of the past wielders of the Black Axe from Bardrick to Celanawe. I'd shown and listed the wielders in the Black Axe book--but they were only ever visualized as embroidery details on the Adana Tapestry––and I wanted to give them a more solid design existence. The set of ten 4.75" x 4.75" prints is available for sale in my online store and comes in a vellum envelope:

https://mouseguard.bigcartel.com/product/wielders-of-the-black-axe-print-set

To the left you can see the finished art for the Tynan, 7th of the Black Axes print in the set. Below I'm going to go through the process to create the art.


Layout:

I started with a pencil drawing of the armored Tynan thinking I'd place him in the middle of a forest fire. Once I had my pencils drawn, I scanned them into Photoshop and placed in a photo reference that I also digitally painted over to get a sense of placement for the branches and embers as well as the open spots for flame. I blocked in the colors for Tynan to make it easier to see him apart from the environment.


Inks:
I printed out the above layout when I was happy with the arrangement and taped that printout to the back of a sheet of Strathmore 300 series bristol. On my Huion Lightpad I'm able to see through the bristol to the the printout to use it as a guide to ink from. I ink with Copic Multiliner SP pens, and I used the 0.7 & 0.3 nibs for this piece.

So much of this piece relied on color that I had to be mindful of what ink shapes and lines were going to be which colors or values.


Color Flats:

When the inks were done, I scanned the art and brought it back into Photoshop to start the coloring process. This is the step where I 'm basically just filling in each area with flat color. But, in this step I also establish the color holds, areas where I want the ink work to be a color other than black. In this piece everything but the border falls into that category: The lineart for the foreground--and lighter yet, the background, the flames, the dots of embers rising up, and the runic numeral '7'. It took a long time to isolate all of that linework and pick colors for them.


Final Colors:

The final colors were rendered by using the dodge and burn tools in Photoshop (and a textured brush) to add shadows, highlights, and textures. I select areas and play with the color balance to shift colors in some areas.

The entire 10 piece print set is available in my online store: https://mouseguard.bigcartel.com/product/wielders-of-the-black-axe-print-set

Tuesday, August 2, 2022

Mouse Guard: King, Knight, Fool Villain Reading


Yesterday I invited Mr. David Sharp (of SharpBalloons Twitch Channel) to read my latest Mouse Guard short story aloud to my Twitch audience.

The story is titled 'King, Knight, Fool, Villain' and is a morality tale that has to deal with the notion of curses, fortune telling, and choosing your own destiny. 

I've made a recording of Mr. Sharp's reading with the story panels, added some Kevin MacLeod music, and uploaded the entire thing to YouTube for your enjoyment. 


Direct link to YouTube:
https://youtu.be/A1lm_necUII

Blog Archive