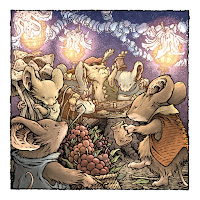
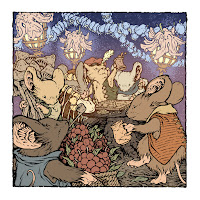
 The piece of Mouse Guard artwork you see on the left is an inked commission (something I almost never do anymore) that I colored for inclusion in my next sketchbook tentatively titled 'Dawn, Daye, & Dusk'.
I was due to be at an event called FACTS in Belgium earlier this spring, but to do legitimate public health concerns, the event was canceled. Before that though, one of the organizers asked for a favor of an inked commission. In this blogpost I'll run through the process to finish the original artwork for them, and to color it for my own purposes.
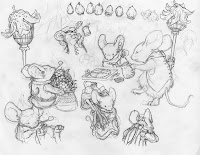 Pencils:
The request was to have a mouse gathering in nature with lanterns and flowers, mice bringing in food and drink, and friends playing games. Something with the spirit of a 'Jill Barklem' illustration was also mentioned. So I started with a sheet of copy paper and pencil ands tarted drawing mice moving game board pieces around, holding tankards, smoking pipes, hauling food, and among them I included a few flower-capped lanterns and shapes for little flower buds that would make good garlands.
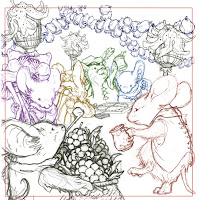 Layout:
With the pencil drawing sheet scanned, in Photoshop I separated out each character or object onto a new layer, tinted it to make it easier to see, and then arranged, resized, and rotated all the bits until I reached some form of composition. With scenes like this, it's tricky to not over complicate the space, while still giving the impression of a bustling little party.
Almost every time I draw a Mouse harvest-type celebration I think back to impressions of Bilbo's Birthday from the book, animated film, and Peter Jackson version to get in the right head-space.
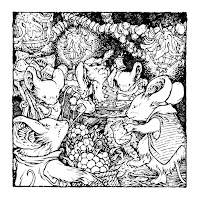
Inks:
When I'd settled on the placement for all the elements, I printed out the layout and taped that piece of paper to the back of a sheet of 300 series smooth Strathmore Bristol. On my Huion lightpad, I was able to see through the surface of the bristol to the printout below so that I could ink using the printed lines as my 'pencils'. I inked this using Copic Multiliner SP pens (the 0.7 & 0.3 nibs).
There was a lot going on here, and I tried my best not to muddy it up with too many textures and tones.
 Color Flats:
The finished inks were then scanned so I could start the coloring process. The first part of which is basically a coloring-within-the-lines step called 'flatting'. I used only flat color to establish what colors the mouse fur was, where it ended and their bare skin showed, the details on their clothes, etc. I also here established a few color holds (ares where I want the ink work to be a color other than black) to give a better sense of glowy light and depth.

Rendered Color:
The final step was to do all the rendering, texture, and lighting effects. I do most of this with the dodge and burn tools in Photoshop.
I tend to stream coloring work like this on my Twitch Stream! Stop by to watch next time I'm live


3 comments:
That is absolutely beautiful!!!
The board game that he is playing doesn't look like Swords & Strongholds... Is they're a new Mouse Guard board game potentially coming out in the future?
Yes David, is there to be another Mouse guard universe Board game on the horizon? Hmmm....😉
I've always wondered about a new board game since reading Legends. At the very end of Legends Volume 3 there is he same circular looking board game and a card game as well.
Post a Comment