
Each Year I create a new limited edition signed and numbered 11" x 11" print. The tradition started many years ago when Julia urged me to create a new print for a convention or event that was 'just pretty'. She thought that we had plenty of images of mice wielding swords and threatening snakes and owls––that the audience, especially women, appreciated when I just drew tender moments, or nature, or flowers. I followed her advice, and for years now fans have proven her right by anticipating and purchasing the new square print I offer.
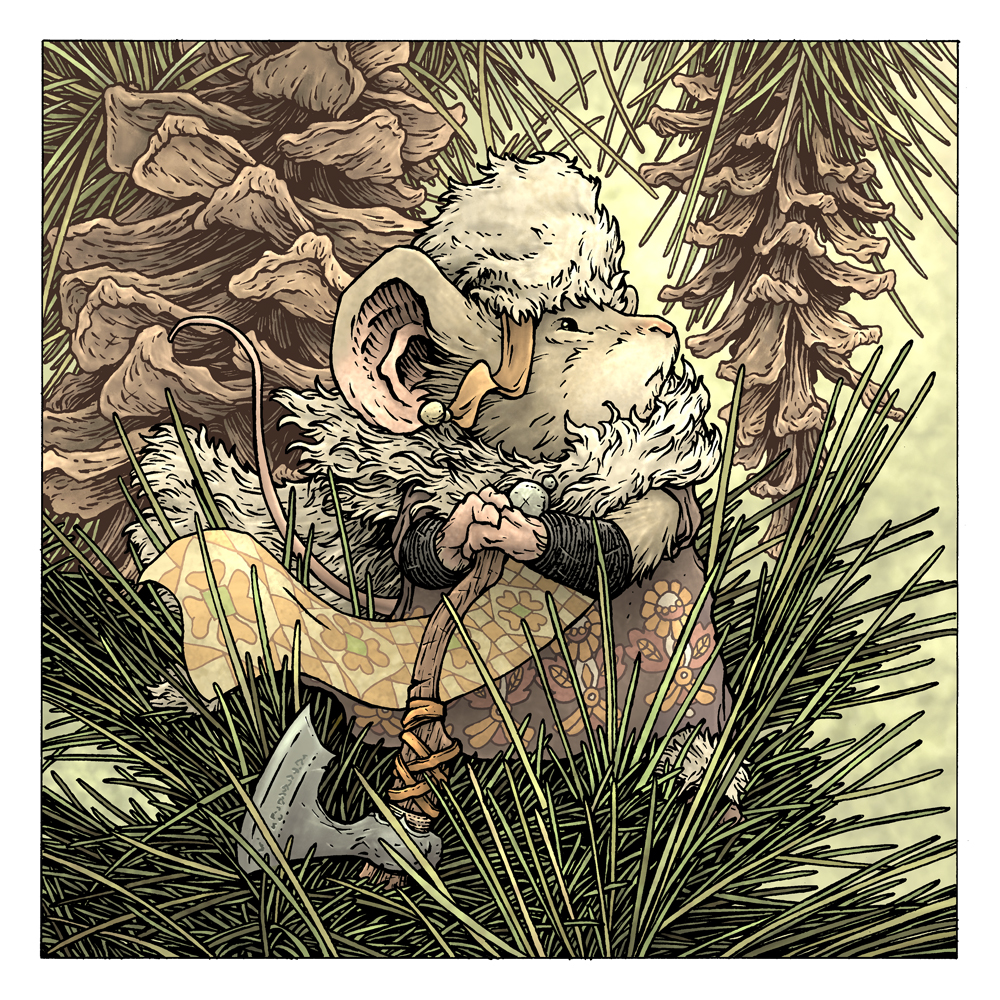
This year the piece is titled 'Pinecones'. Below I'll show the step-by-step of creating the art.
The inspiration came from a photograph (actually a series of 4 photos) of some pinecones outside our vet's office the last time we had to take Coco in. I liked the shapes and negative spaces they formed, and thought when I took the photos 'these would be good for archer mice to stand atop as they scout and rain arrows down on their foes'.
I also looked at a few Illustrations by Russian artist Ivan Bilbin for textile & border patterns to use in my piece.
I drew the mouse who was to be in the pinecone & needle terrain on copy paper. I wanted her to have a fur cloak and a tall fur hat blowing in the breeze. For her to feel somewhere between Russian and Norse. I drew the pattern on the dress once, and then in Photoshop repeated it and warped it to fit the contours of the fabric, and I did a similar thing to warp a pencil drawing for the flowing panel with the border pattern on it.
On yet another sheet of copy paper, I used my photo reference to draw the pinecones and needles behind her, but then I just gave up and slotted in more of the photos (masked out to show as much of her as possible) for the foreground she's standing on.
Then I print out the above composition. Because of it's size I have to print it in two parts and then tape them together. That whole printout is then taped to the backside of a sheet of Strathmore 300 series bristol. On my Huion lightpad I can ink the piece on the surface of the bristol while still seeing my 'pencil' lines on the printout below.
I inked this with my Copic Multiliner SP pens (the 0.7 & 0.3 nibs). There was a LOT of repetitive forms in the needles, and seeing clearly what bits of white paper were the inside of needles and which were negative spaces was a real struggle.
When the inks were done, I scanned those back into photoshop to start the coloring. The first part of that is called 'flatting' where I establish what color everything is and where those areas end with flat un-textured colors. Like, professional coloring-in-the-lines. I also established some color-holds (areas where I want the ink work to be a color other than black) like the background cones and needles as well as all the patterning on her clothes.
I'd made most of my color choices when I was compositing the pencil drawings, so this step was rather procedural.
The last part was to render the color––to add light, shadow, and texture. I do this in Photoshop mostly with the Dodge and Burn tools and a stock textured brush.
'Pinecones' will be released and made available for purchase in my
online store at the start of my March ONLINECON event April 6-10


 The last part was to render the color––to add light, shadow, and texture. I do this in Photoshop mostly with the Dodge and Burn tools and a stock textured brush.
No comments:
Post a Comment