I've made some new Mouse Guard stickers for sale at conventions and in my online store. In the past I'd avoided stickers as a product, partly because in the paperwork of some conventions they have a clause that if your stickers are found defacing the building, sidewalks, or public property around the convention center, you would be charged for the cleanup. I'd never heard of anyone ever having to pay, but it was still a discouragement.
But over the years, I've seen more and more people making stickers, and had some requests for them––so it seemed past time to offer some.
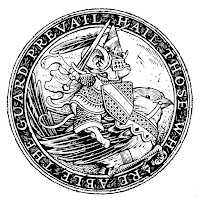
The art on these stickers was inspired by the seal of Thomas Beauchamp, 11th Earl of Warwick:
https://en.wikipedia.org/wiki/Thomas_Beauchamp,_11th_Earl_of_Warwick.
However, my mousified version was never intended for these stickers––it was going to be the
2023 Bookplate. After drawing it though, I wasn't convinced it would be right for that product and realized it would work perfectly for a 4" round sticker.
I penciled the art for this on a few separate sheets of copy paper. I started with the mouse, using the pose and armor stylings from the Earl of Warwick seal. Then, instead of a horse, I drew a sparrow. I regret bending the tail feathers up right at the origin to get them to fit in the circle, I should have curled them around––while stylized, they would have looked less 'broken'. on the last sheet of copy paper I drew the bird's rigging and regalia.
The circles were drawn in Photoshop where I combined all the paper drawings and added in the 'Hail Those Who Are Able The Guard Prevail' text.
The above layout was printed out and then taped to the back of a sheet of Strathmore 300 series bristol. On my Huion lightpad I was able to see through the surface of the bristol to the prinout and use it as a guide to ink on. The pens I used were Copic Multiliner SP pens (the 0.7 & 0.3 nibs).
In trying to make this look like a cross between an engraving and a relief print, I went with bold outlines, and stylized textures. It was while I was inking this I started thinking 'This could be a coin'...which stuck with me when starting to color it...
When I scanned the inks and started to color the pieces, I flatted in an orange color first, with the idea I could render it to look like a copper coin. I used the dodge and burn tools in Photoshop to get the rendering effects and dropped in a photo of tarnished copper to get the verdigris effect. I liked the coin version, but thought it would be nice to see it colored traditionally as well, so I did––and both versions are now available as 4' stickers in my online store:


 The above layout was printed out and then taped to the back of a sheet of Strathmore 300 series bristol. On my Huion lightpad I was able to see through the surface of the bristol to the prinout and use it as a guide to ink on. The pens I used were Copic Multiliner SP pens (the 0.7 & 0.3 nibs).

No comments:
Post a Comment