Tuesday, June 3, 2025

Dawn of the Black Axe #1 Montes Cover Process

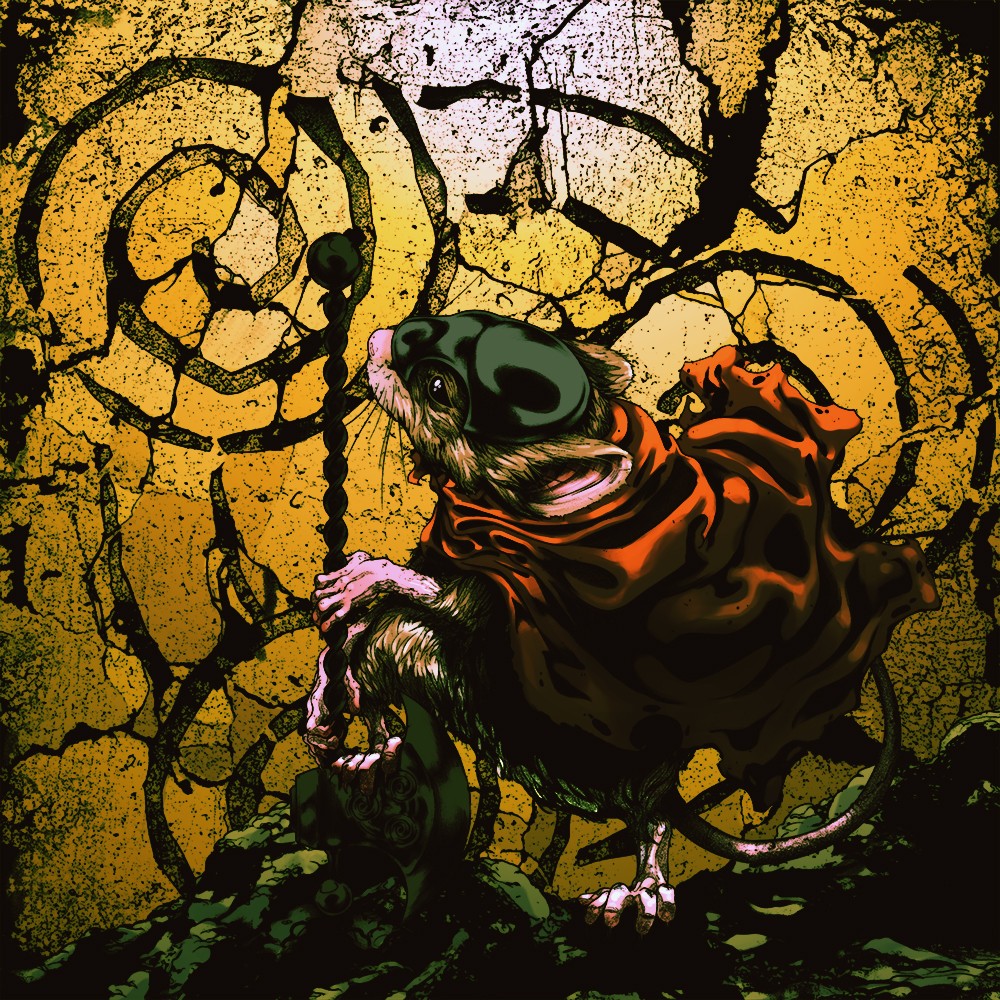
Goni Montes provided a variant cover for Mouse Guard: Dawn of the Black Axe #1. His involvement was part of BOOM!'s 20th anniversary program for each month to have #1s all drawn by the same variant artist, and Goni, who has done numerous Power Rangers covers for BOOM! was their artist for March.

To the left you can see his final cover (with logo--though there was also a version released without any trade dress).

Below are images and a video showing Goni's process.

As the cover was being created I somehow only saw the rough options and then the final (which I only had notes with regards to color/brightness for printing complications)

I reached out to Goni to share process images and his thoughts about creating the cover. Here's what he said:

GONI: "I kinda work as if it were gonna get silk screened, which is my background, so that’s why it’s kinda easy to layer things this way and then take a look at every single layer independently.

The linework is drawn digitally. My brushes are my own. I make them by scanning in ink marks that I make on my sketchbooks. The textures in the backgrounds and the cracks and all that stuff are done on analog paper and inks in this case. It’s just faster and a hell of a lot of fun to just ink
grungey stuff on paper and then scan it in at ridiculously huge size"


Tuesday, May 27, 2025

Dawn of the Black Axe #1 Laufman Cover Process

Mouse Guard: Dawn of the Black Axe issue #1 had several variant covers and the one available exclusively through BOOM! Direct (my publisher's online store) was drawn by Derek Laufman

I suggested Derek to the editors because of seeing this piece of his on his social media and thinking it felt very 'Mouse Guard':
 https://cdn.bsky.app/img/feed_fullsize/plain/did:plc:zrn73yyjy3ykioirprgvvgea/bafkreifim6cpbwyw34hhz3igtttk43am2egy42thizl2nx373sndnjredu@jpeg

Below are some of the steps Derek has offered to share as part of the process:

Initial rough options:
I was shown these as an A & B option.


Rough A:

While this scene isn't specifically in issue 1, it felt like a good summary of the series.

Pencils:
I never saw these pencils––I think for approvals we went from rough to inks, but Derek was good enough to dig out this file and share it. I believe the pencils are all digital.

Inks:

Derek prints out his digital pencils on art board and then inks traditionally.

These finished inks were what I saw next and approved.

Color Flats:

This is another step I didn't see, but Derek shared now for this post. He's laying in flat colors that aren't necessarily the final palate with no rendering or texture just to establish the areas of color.

Final colors:
The final art as it was printed. 

Thank you Derek for the awesome cover and everyone please check out Derek Laufman's other work:
https://www.dereklaufman.com/ 

Tuesday, May 20, 2025

Facsimile Edition Sketchcovers

 To celebrate the 20th anniversary of the first issue of Mouse Guard, BOOM! has released a facsimile edition printed in black and white to match the original self-published issue...

But I also had a blank sketchcover version of that comic printed that is exclusive to get through my online store or at a convention appearance.

I've made the blank version available in my online store: mouseguard.bigcartel.com but I've also drawn on several in advance that I've also put up for sale.


When these have sold, I don't know when I'll be able to draw more for sale, but there are plenty of blanks, and I hope to draw on them at this year's conventions for fans as well.


Tuesday, May 13, 2025

20th Anniversary Print

This weekend marks the 20th anniversary of the first self-published issue of Mouse Guard that I released at Motor City and to help celebrate, I decided to do a new 14" x 20" print of the Guardmouse trio of Saxon, Kenzie, and Lieam on the adventure that started it all.  

The signed print on heavy paper stock will be available at Motor City Comic Con and then in my online store soon afterwards (and perhaps at other summer cons I attend). 

Below I'm sharing the steps in creating the artwork for the print...


I wanted the print artwork to be a scene from that first issue (originally published in black and white––because that was all I could afford at the time). There are the panels of the trio walking where we first meet them and learn their names, there's the scene with Lieam facing the black rat snake, and there was this scene with the overturned grain cart (though I also considered the moment where they camp overnight in it as well)

As I posted a few weeks ago, I made a model of the grain cart specifically for this print...and to have a day away from the drawing board and computer to stretch creatively.

Then I went for a walk.

In the woods along nature footpaths I'd place the cart model in the tree roots and base of any tree that inspired me. I took photos of different angles, placed the cart in different positions and looked for that 'right' inspiration. There were several more photos that what I have shown here.

Because I was taking these photos on my phone, I didn't really get to inspect them until I was home and could pull them up on a large screen. I picked the last on the top row of this grid.

Time to start drawing! I did a combination of using smaller scanned pencil drawings of the characters along with a reference drawing of the cart and digital color blocking and re-drawing...all to get this rough that I just wasn't happy with.

I played with sky color, mouse placement, and how tightly cropped in we were...

This version, with Kenzie kneeling was a digitally drawn edit to help the composition, but it still felt off to me. And Julia agreed. Worried I was putting too much pressure on myself to get a print done before the convention she suggested that I could stop and postpone it for a later convention.


The next day I went back in to the file and mirrored the whole thing. I did that just to see if that trick would help me see compositional flaws...and instead, it just became more interesting to my eye. And I realized this direction matched the original panel better. So, I started redrawing the tree and each character (on a light pad overtop of a printout of the rough version) and had to take special steps to get Saxon's food placement to work on the mirrored cart (since I liked him looking out into the open space rather than at the tree trunk (which also more closely matches the original panel.

Here you can see the tightened pencils all placed and color blocked in ready to ink.

The above layout was printed out at size (14" x 20") over several sheets of legal size paper and then taped together. That was then taped with painters tape to the back of a large sheet of Strathmore 300 series bristol. 

On my Huion lightpad I was able to see through the surface of the bristol to use the prinout as a guide to ink from. I used Copic Multiliner SP pens (the 0.7 nib mainly, but I think I used a smaller nib for the eyes).

I did the inking in two sessions: the cart, characters, foreground, and tree trunk outline in one go, and then the hatching on the tree and the distant silhouette trees in another.

The art was then scanned (in two passes) on my scanner ready for color.
Then I started color flatting...this is the step all about establishing all the areas of color with flat colors (no rendering, no texture). I use different layers for different color groups (fur, cloaks, ground, sky, etc). The colors don't even need to be accurate––in some cases using entirely the wrong colors helps make the flatting process easier by thinking about shapes rather than color theory and final palates.

This version is in that first stage where are the colors are purposely wrong (including the color hold––an area where I want the ink lines to be something other than black, on the distant trees.

And then what I thought was going to be the final color scheme. Just like the original rough for his piece.

A sunset sky with purples going into oranges. It was a nod to the bit in the first issue where after they find the cart the daylight is dying and they need to camp overnight before continuing their search. I also though making the purple sky helped differentiate it from so many of my other prints with pale yellow skies.

I actually rendered most of it with this color palate in place...and only at the end realized I didn't like it.
So, I swapped out the sky for a more autumn leaf color sunset, tinted the trees and all the base colors warmer so the new sky lighting worked with everything else.

Here are the final colors again, all rendered using the dodge and burn tools and a textured brush in Photoshop.

The 14" x 20" print on heavy paper will be available at Motor City Comic Con this weekend and in my online store soon afterward

Tuesday, May 6, 2025

Dawn of the Black Axe #2 Release Party

Mouse Guard: Dawn of the Black Axe issue 2 will be in stores tomorrow! It's being offered with 3 different covers.
You can see the art process posts about each cover here: 
Gabriel Rodriguez: http://davidpetersen.blogspot.com/2025/03/dawn-of-black-axe-2-rodriguez-cover.html

David Petersen: http://davidpetersen.blogspot.com/2025/03/dawn-of-black-axe-2-petersen-cover.html

Kevin Eastman: http://davidpetersen.blogspot.com/2025/03/dawn-of-black-axe-2-kevin-eastman-cover.html
I'll also be hosting a virtual release party for paid Patreon subscribers over on: patreon.com/davidpetersen May 7th at 8pm Eastern.

I'll talk about the issue's story, share some behind the scenes thoughts and process, and take viewer questions. You just need to subscribe at any tier before the event to participate.

I look forward to hearing what you all thought of Bardrick's adventure with the Black Axe in this middle issue of the series.

Tuesday, April 29, 2025

Free Comic Book Day 2025

For Free Comic Book Day this year BOOM! has an offering with a Mouse Guard story that will see publication for the first time: King, Knight, Fool, Villain. 

For those of you who don't know, most comic retailers offer a selection of new comics on the first Saturday in May for FREE! They use it as a way to try and get people who have never tried reading a comic -or- haven't picked up a comic in years, to try a comic for free. Many stores will also have planned signings, events, food drives, and sometimes sales for their regular inventory.

I believe that because comics are stories, there is a comic for every person in your life who enjoys stories...(I've done a post about recommendations for those reluctant-to-comics folks in your life who think comics are all capes, cowls, bullets, & blams: https://davidpetersen.blogspot.com/2018/05/recommendations-of-comics-by-genre.html)


The short story in my publisher BOOM!'s FCBD offering 'King, Knight, Fool, Villain', was originally drawn in my usual square Mouse Guard format (I've shared live readings of this story online and at some conventions), but it has not yet been collected (I still need a few more tales this length to make a new hardcover of similar stories).

Because the FCBD book is a 'standard' comic format, I had to move and resize a few panels around and re-letter the whole thing so the text was still readable at the new scale. While it took some work, I'm pleased with the alterations to have this story see print for the first time.


The story features a mouse soothsayer who uses bone cards to fortell the future...and while I was working on it, I needed to design a few of those Tarot-like cards to draw into the story...and by the end, I'd already drawn about one-third of the total number of cards in the deck, so I went ahead and drew the rest so that Mouse Guard fans could own a deck of their own, either just-for-fun or to incorporate into their Mouse Guard RPG sessions. These are available to purchase in my online store: https://mouseguard.bigcartel.com/product/soothsayer-s-deck-of-bone-cards

Past blogpost with more info on the cards: https://davidpetersen.blogspot.com/2022/10/soothsayer-deck-of-bone-cards.html


I'll be signing and doing doodles and setting up with a mini-con booth at Green Brain Comics in Dearborn, MI. I'll be there from 2pm-6pm (Jeremy Bastian of Cursed Pirate Girl fame will also be there)
So, I hope to see you this Saturday, either in-person at Green Brain -or- posting photos online of what you picked up for FCBD and who in your life you introduced to comics with a free issue of something.

Green Brain Comics

13936 Michigan Ave
Dearborn, MI 48126

Tuesday, April 22, 2025

Model Grain Cart

It's been a long time since I built a reference model, but on a day this week when the weather had changed for the warmer, I was out picking up sticks the oak drops on our driveway and I got inspired. 

I plan do do a new piece of artwork (probably a print to be released at Motor City Comic Con) that would pay homage to the first ever issue of Mouse Guard where Saxon, Kenzie, & Lieam discover the broken grain cart from the merchant they were tasked with finding. 

The sticks, warm weather, and this upcoming artwork on my mind came together and gave a me a time away from the computer and drawing table while still being creative and using my hands.

Before I started in earnest, I printed out a page from that first issue as well as a re-design of the grain cart I drew in 2017 (and was in that year's sketchbook). I thought it would be handy to have these in sight when at my workbench in the garage.

I wanted to be closer to the original in overall form, but take some of the cues from the latter with some of the details and organic shapes.

Below is more of a series of photos, rather than a step-by-step tutorial, that I managed to take (when I remembered to take photos) while working. Also, please excuse the state of my workbench--it has been a catch all and not tidied since last fall when the weather was still suitable for an unheated garage.


My first pile of fallen sticks gathered from my patio and yard. When I was a kid my Dad had a tall cardboard box full of tree debris like this that had fallen from our maples and elms in Flint, MI that he'd use to get a charcoal fire going for cooking out (no lighter fluid used by Eric Petersen!)


I used a box cutter or a wire brush to remove the loose bark and lichen. This was where I discovered I needed more sticks because so many would break at weak or rotten spots.


Starting to glue up the frame with super glue. I had to make a run to the hardware store because the two bottles of glue I managed to find in my studio and in the garage were only 5%-10% full and both dried solid.

I used popsicle sticks to deck the bottom of the cart. I used pliers to break off the ends rather tan a saw to give them a more rustic look.

Gluing the uprights for the side walls. There were lots of decisions here about placement of these that will effect the way the side walls attach.


I wanted a more robust structure to hold the axles, so I cut out a piece of pine on my scroll saw. (I think this was a really thick pain stirring stick--or if not, something similar.


hacked at the axle mounts to make them looked mouse-carved and them gave them some stain. Also laid in the axle brace, which was a pre-cut piece of doll-house framing.

Back to the cart adding top rails to the walls..still just superglue...
oh, and you can see my bad decision to stain the popsicle sticks. It made it a mess and I don't care for the color, so I didn't do any more after that.

Used braided cotton chord used for snapping chalk lines to lash the corners together. Each knot got a little dab of super glue so it stays put.


Starting on popsicle stick planks for the side walls. Again, just breaking the ends off with a pair of pliers to get them to length.

Done with the side walls and opted to add another stick as framing in the middle of each wall to make it more visually interesting.

I should have showed this wheel process more. I took oak scraps from when I milled some for a gate on our basement stairs, and cut 4 equally long pieces (per wheel). On my belt sander I hacked into them each individually making the surface uneven, divoted, and differing thickness. They were then lined up edge to edge and I traced a circle on them using a can of wood stain as a template. I cut on the pencil line of each piece and then glued them together making sure not to align them perfectly. The hub is a bit of dowel, a washer, and a nail.

Warping popsicle sticks as cross bracing and clamping across the uneven surface while the glue dries

On the back of the cart I wanted to make the structure more interesting so I used a few more oak twigs. Here are my sub assemblies of cart, axle mount, and wheels.

When it came time to plank the back wall, I found I had to bend or slightly break each one in the middle so that I could glue both end touching the corner posts as well as the center post.

And here agin is the final product. Are there things I wish I did differently: YES! I immediately saw all sorts of changes I'd like to make. Some were aesthetic, others were believability of function, and some were just afterthoughts about how I could have made life easier on myself.

However, I'm not going to spend any more time on this. I appreciate the time away from the studio doing work-work and being outside on a nice day. But as this is a reference for a drawing, I can make many of those changes in the drawing as I go. 


Blog Archive