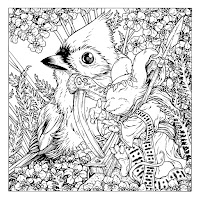
This year the piece is titled 'Yarrow' for the flower shown in the image.
Below I'll show the step-by-step of creating the art.
For the pencil drawings, they are all 0.5 mechanical HB pencil on regular copy paper. I started with the drawing of the mouse playing the harp (I'd drawn her before in a few Mouse Guard pieces), and then didn't know what to pair her with...would she just be surrounded by flowers? berries? another animal, insect, or bird? So I tried in Photoshop to place a few photos of those things next to her––a butterfly or swarm of butterflies almost won-out, but I really liked images I found of a Tufted Titmouse. On my lightpad I was able to draw the bird on another sheet of paper while lining it up with the existing drawing of the mouse.
I'd also found images of the yarrow flower, and drew in heaps of those on the bird drawing too. And so it felt more like Mouse Guard, I also drew a spear that I could play with placing in the next step.
I scanned in those pencil drawing into photoshop and assembled them into a composition. This included doing a rough coloring job to help block in the forms. This helped me in terms of the masses for composition (in fact I digitally added in a few more flowers, leaves, and stems where I felt they were needed) but the coloring work at this stage also helps me on the next step when I'm inking so I can see clearly what everything is, so that I ink the contour and texture of a flower petal differently than a leaf or cloth or animal.
Then I print out the above composition. Because of it's size I have to print it in two parts and then tape them together. That whole printout is then taped to the backside of a sheet of Strathmore 300 series bristol. On my Huion lightpad I can ink the piece on the surface of the bristol while still seeing my 'pencil' lines on the printout below.
There was a lot of repetitive forms in the flowers, and I tried to focus on making the space in between them dark so they receded away, and much of the character space is open without a lot of texture or rendering to help give the eye a break in that sea of tight flower inks.
 When the inks were done, I scanned those back into photoshop to start the coloring. The first part of that is called 'flatting' where I establish what color everything is and where those areas end with flat un-textured colors. Like, professional coloring-in-the-lines. I also established a few color-holds, areas where I want the ink work to be a color other than black (here I did it on the dress embroidery pattern, the background foliage, and on the harp strings (which were inked on the back side of the bristol on a lightpad so I could isolate those lines very easily.
I'd made most of my color choices when I was compositing the pencil drawings, so this step was rather procedural.
The last part was to render the color––to add light, shadow, and texture. I do this in Photoshop mostly with the Dodge and Burn tools and a stock textured brush.
'Yarrow' will be released and made available for purchase in my online store at the start of my March ONLINECON event (Mar. 24-28––more info coming soon)


1 comment:
When will the comics adventures continue?
I'm really looking forward to it!
Post a Comment